The C++ programming Language
by Tyler Swann
This book assumes you are using a C++17 compliant compiler but concepts and topics from later standards are also covered, notably C++20. See the “Installation” page of the “Getting Started” Chapter for more details.
This book is under active development. Much of the material is absent, incomplete or subject to change. If you have suggestions create a discussion or issue on GitHub.
Introduction
Welcome to The C++ Programming Language, an introductory book aimed at teaching C++. C++ is a high-level, general purpose, multi-paradigm programming language aimed at giving developers precise control over their programs while also being able express many kinds of abstractions, making the C++ a very powerful language.
Who/What is C++ for?
C++ was designed for building systems and embedded software in resources constrained contexts. These are systems that prioritize performance, efficiency and flexibility of use. C++ allows developers to write fast code that can run or make any kind of system. If you want the ability to build helpful abstractions but needs to run in a constrained environment and use resource as effectively as possible C++ will get you there.
Who is this book for?
This book is generally aimed at people who have programmed before but can be read by those still early in their learning journey. This is to say you should have an idea about what a program is and understand common programming concepts. The aim is to make this book as approachable to as many people as possible. It is possible to read this book without any prior experience to programming but some concepts may not click as quickly if you have never programmed before. The purpose of this book is to showcase how to program using C++ and explore the capabilities the language possesses.
Note
Not every topic or capability of C++ will be explored in this book. For a comprehensive reference on the language explore cppreference.com.
Important
Author’s note on C++ Standard Used in this Book
Currently this book only covers up to the C++17 Standard, even though C++20 (2020) and C++23 (2023) have been released since and C++26 (2026) is actively being written, C++17 is the most supported version by compilers across all new changes. C++20 is nearly there with Modules being the main thing that remains to be implemented however, there is not much that was introduced C++20 that I plan to cover in the immediate draft and thus setting the baseline at C++17 narrows my focus to ensure the foundation is solid. Future versions of the book that introduce features from later standards will likely result in the suggested baseline being increased to C++20.
How to Use This Book
In general, this book assumes that you’re reading it in sequence from front to back. Later chapters build on concepts in earlier chapters. Some chapters will explore creating mini projects that combine concepts from recent chapters to allow you to get some experience writing complete C++ programs.
Tip
You can also search for specific content using the search button in the top left or by pressing the S key.
Synopsis
- Getting Started, explains how install the necessary tools for compiling C++ programs
on various platforms like Windows, macOS and Linux. It also goes through writing a
classical
"Hello, world!"program and will discuss the anatomy of a basic C++ program and using the CMake build system. - Project: Guessing Game, is the first project chapter where you will build a simple ‘number guessing game’. This will introduce you to compiling and building a C++ program and utilising various pieces from C++ at a high level, with later chapters offering more details.
- Common Programming Concepts, will cover the basics of the C++ language from variables and data types to creating functions and controlling the execution flow of a program.
- Ownership, will cover C++’s ownership model and how you are able share data or even transfer data ownership.
- Structured Data will look at how to create custom types using structures and classes.
Planned
- In Managing Projects we’ll use CMake to compile multiple files, manage dependencies and create libraries.
- Error Handling will look at the various ways to verify the correctness of your programs at compile time. We will also look at recovering from errors to prevent crashes.
- Containers explores the most commonly used container types available in the standard library.
- Templates covers C++’s meta-programming capabilities that allow you to write code once and have the compiler generate the implementation for you.
- In Algorithms we’ll explore the plethora of standardised algorithms available in the standard library and how they interact with containers.
- The IO chapter will look deeper at C++ IO capabilities using streams and explore the filesystem library.
- In the Memory chapter we will explore how to safely (and unsafely … for science) control memory.
- In Concurrency we will look at how to make our programs run in parallel using a myriad of concurrency concepts while ensure safe access and manipulation of shared data.
- The appendices hold extra information may be of use to the reader but do not fit in
elsewhere in the book.
- A - Operators
- B - Value Categories
- C - Standard Versions
- D - Recommended Compiler Flags
A - KeywordsD - Compilation PipelineF - Compiler Vendors
Possible Future Chapters
- IO Project, will look at utilising ideas from previous chapters in order to build a
tool that replicates a subset of the functionality of the command line tool
grep. - Algorithms, will showcase a few of the common algorithms available in the C++ standard library and they can be used to manipulate any of the standard containers in an expressive and generic manner. We will also cover the concept of a range and a view and how they allow use to write composable algorithms.
- Improved IO Project, will look at improving our IO project from Chapter 11 by utilising the standard algorithms.
- Object Orientated Programming In C++, covers C++ support for write object orientated code and how it contrasts to the rest of the languages features and object oriented principles you may be familiar with from other languages.
- Date, Time and Localization, introduces C++ support for working with time and dates how to change the locale currently being used to express said times and dates.
There is no wrong way to read this book; if you want to skip ahead, go for it! You might have to jump back to earlier chapters if you experience any confusion. But do whatever works for you.
An important part of the process of learning any programming language is learning how to read the error messages the compiler displays, which can be challenging for large codebases, especially if they are written in C++ (although this is improving). Error messages no matter the language will offer key insight into where the compilation of a program failed and in the case of C++, why it failed, which will guide you toward working code. As such, I’ll provide many examples that don’t compile along with the error message the compiler will show you in each situation. Know that if you enter and run a random example, it may not compile! Make sure you read the surrounding text to see whether the example you’re trying to run is meant to error.
Note
The error message style and content can be dramatically different given a different compiler, compiler version and standard of C++ being used.
Source Code
The source code from which this book is generated can be found on GitHub. Refer to the supporting docs on the books repo for details on how to contribute changes, fix typos or create new content for this book.
External Resources

Getting Started
Let us begin our journey! In this chapter we will discuss:
- Installing C++ on Linux, macOS and Windows
- Creating a C++ program to print
Hello, world! - Using CMake to create cross-platform builds.
Installation
Each platform or Operating System (OS) has a different set of compiler tools so the following sub-chapters will outline how to get setup on each platform.
Available C++ Compilers
| Compiler | Description | Windows | Linux | MacOS |
|---|---|---|---|---|
| GNU Compiler Collection (GCC) | A collection of compiler technologies for many different languages including C, C++, Objective-C, Ada, D and Go. Part of the GNU project and the default compiler on Linux. | ✅1 | ✅ | ✅ |
| Clang | A compiler frontend and build runner that is a part of the LLVM Project. Used to compile C, C++ and Objective-C. | ✅2 | ✅ | ✅ |
| Microsoft Visual Compilers (MSVC) | Microsoft’s proprietary compiler toolchain for building C and C++. Usually installed with the Visual Studio IDE. | ✅ | ❌ | ❌ |
Important
The use of
$or>as the first character on a line in any code block for a shell (commands etc.) is used to indicate the prompt with the command following. This is used to clarify a shell code block that contains commands and the (generally) expected output. You do not need to copy the$or>when running commands.
Linux
Installing GCC and Clang on most Linux systems is relatively trivial. Most of the time it requires just installing the GCC or Clang package and some supporting developer tooling packages. These are often bundled together to make installation as simple as possible.
Installing
Depending on your distribution you will use a different package manager and package upstream repository, therefore some package names might be different than what is listed below. Consult your platforms docs for the most seamless way to install a C++ compiler if the below commands fail.
# Debian, Ubuntu, ElementaryOS, Linux Mint, Pop!_OS (APT)
$ sudo apt install build-essential gdb clang llvm cmake

# RedHat, CentOS, Fedora (DNF)
$ sudo dnf install make automake gcc gcc-c++ kernel-devel gdb clang llvm cmake

# Arch, Manjaro (Pacman)
$ sudo pacman -Sy base-devel gdb clang llvm cmake

# OpenSUSE (Zypper)
$ sudo zypper install -t pattern devel_basis
$ sudo zypper install gdb clang llvm cmake
Verifying Installation
To verify the install worked for either GCC or Clang we can run the compiler programs with the version flag and ensure the install has been successful. You should get something like the following output:
# Verify GCC
$ g++ --version
g++ (Ubuntu 11.4.0-1ubuntu1~22.04) 11.4.0
Copyright (C) 2021 Free Software Foundation, Inc.
This is free software; see the source for copying conditions.  There is NO
warranty; not even for MERCHANTABILITY or FITNESS FOR A PARTICULAR PURPOSE.

# Verify Clang
$ clang++ --version
Ubuntu clang version 14.0.0-1ubuntu1.1
Target: x86_64-pc-linux-gnu
Thread model: posix
InstalledDir: /usr/bin
Tip
Any details displayed from verifying a given newly installed tool may differ to what is displayed in this book.
Tip
- The name of GNU’s compiler toolchain is ‘GCC’ aka GNU Compiler Collection. This is in contrast to the CLI tool called
gccwhich stands for GNU C Compiler.- The C++ compiler from GCC is called
g++. Make sure to use this command when compiling C++ code.
We will also want a tool to help manage larger projects and allow us to build on different machines from the same source. CMake is one such build tool for C++ projects. You would have already installed CMake when you installed the C++ compilers earlier as we added CMake to the install list. You can verify by running:
$ cmake --version
cmake version 3.25.1

CMake suite maintained and supported by Kitware (kitware.com/cmake).
Windows
Windows has many different compilers at its disposal. Some offer native support to building against the Windows runtime while others will emulate a UNIX (the predecessor to Linux and BSD) environment to aid in porting software built for UNIX-like systems. As the specifics can get confusing, this book will only cover the installation of Window’s native compiler toolchain MSVC.
MSVC Installation
The Microsoft Visual C++ (MSVC) compiler is Microsoft’s official toolchain for building
software natively on Windows. It is installed with the Visual Studio Integrated Developer
Environment (IDE). MSVC (and the whole Visual Studio suite) can be obtained from
Microsoft’s official download page. Make sure
to select the correct edition (community being the free version) and click ‘Download’.
This will download the setup program VisualStudioSetup.exe, which is used to install
and configure Visual Studio Installer (VSI). The VSI allows you to select which tools and
technologies from the Visual Studio suite you want to install. Once you have installed
the VSI, start the program and you should be presented with some default tool
configurations (workflows). For developing with C++ you will need to select the ‘Desktop
development with C++’ workflow. You will also want to tick a few optional features as
well (found in the side bar).
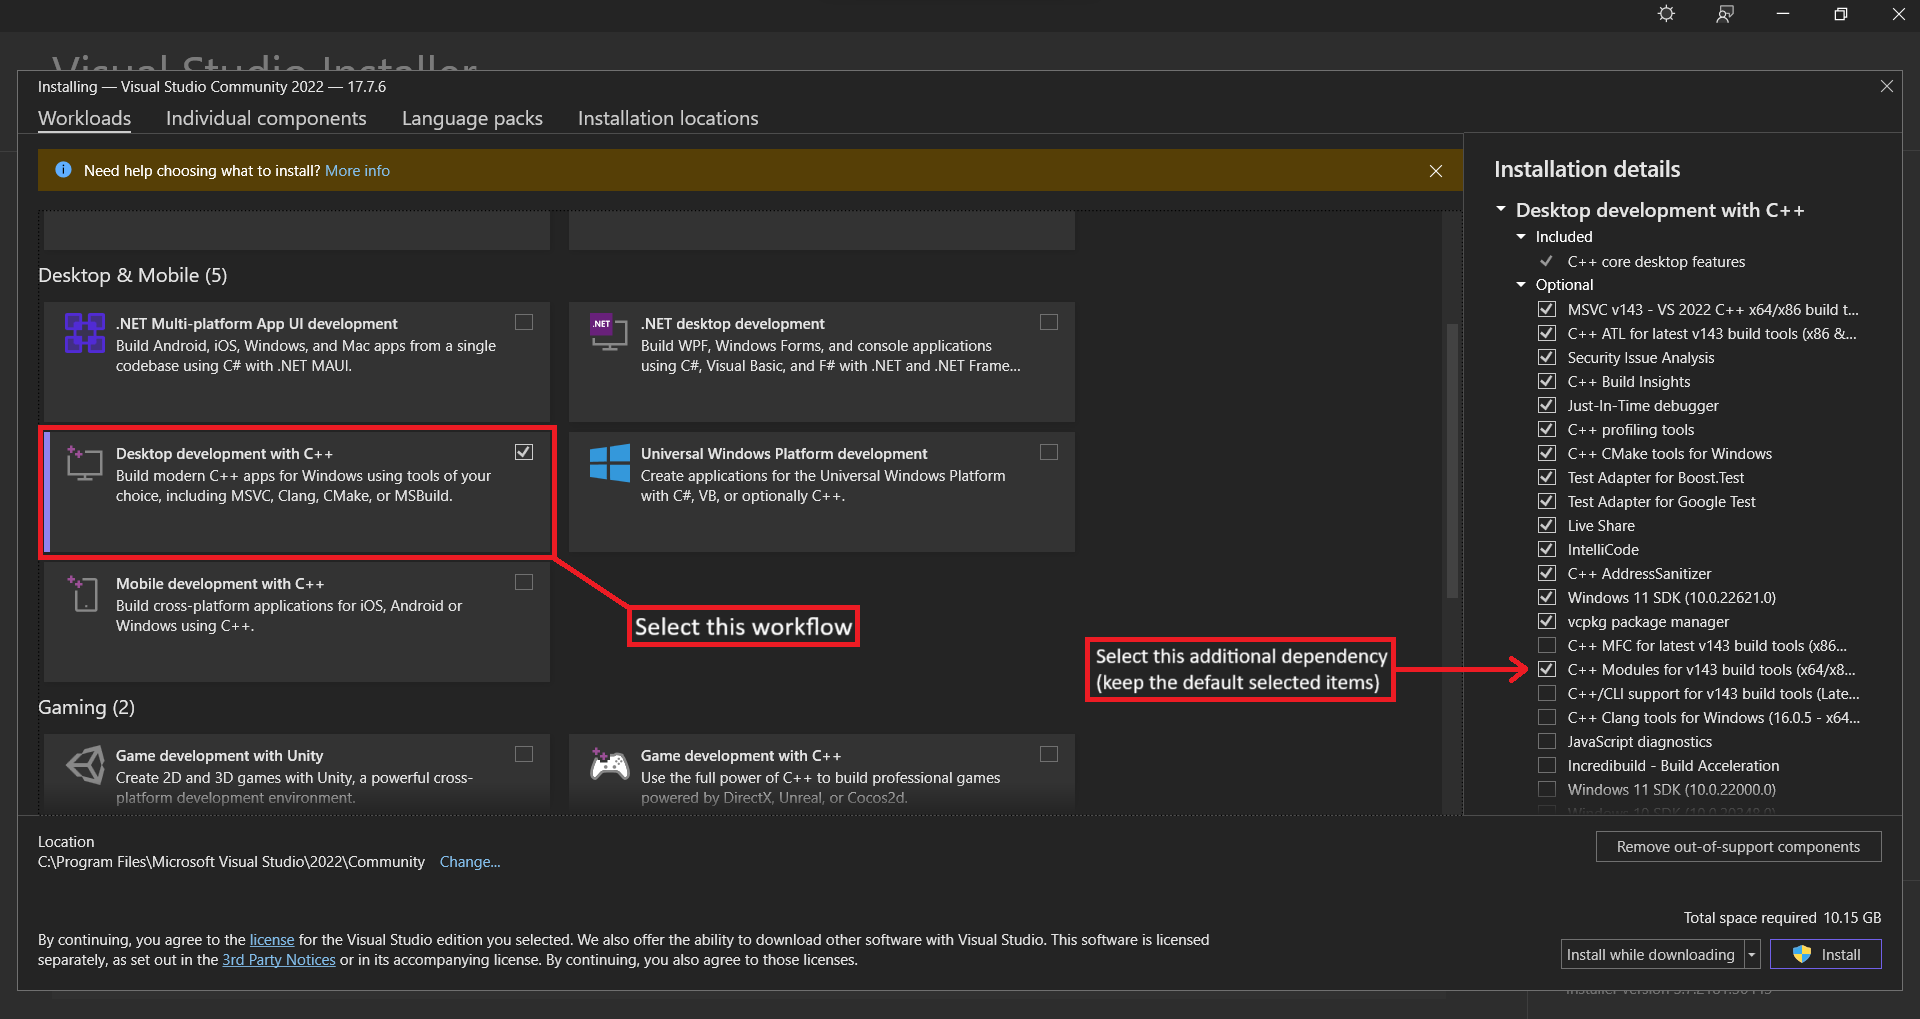
Finally, click the ‘Install’ button in the bottom right of the window to start the installation.
Verifying MSVC Installation
To verify you installed Visual Studio correctly you can open the newly installed ‘Developer Command Prompt for VS’. This prompt is needed in order to load the MSVC tooling into the prompt as it is not including by default in CMD or PowerShell. Simply run the following command to verify the install of the compiler.
> cl
Microsoft (R) C/C++ Optimizing Compiler Version 19.37.32822 for x86
Copyright (C) Microsoft Corporation.  All rights reserved.

usage: cl [ option... ] filename... [ /link linkoption... ]
Note
Any details displayed from verifying a given newly installed tool may differ to what is displayed in this book.
Tip
Alternatively you can follow Microsoft’s tutorial for creating a new C++ VS Project. This will be more convenient than opening a ‘Developer Command Prompt’ every time you want to compile a program and having to run the
clcommand manually but it takes more work setting compiler flags etc. for simple projects.
CMake is a build tool for C++ projects. It is used to manage different configurations for a projects. You can download the latest release from CMake’s Release Page (scroll down to ‘Latest Release’ not ‘Release Candidate’). You can verify it was installed correctly by opening CMD and running.
> cmake --version
cmake version 3.25.1

CMake suite maintained and supported by Kitware (kitware.com/cmake).
Installing Git
We will also need to install Git in order to install a particular package later. Git can
be installed by going to the ‘Git for Windows’ installation
page and selecting the correct version (eg. x64 for 64-bit systems) and following the
installation Wizard. Be sure to select the option for adding Git to the PATH.
MacOS
To install GCC and Clang on MacOS we will need Apple’s developer toolchain called Xcode and a package manager for MacOS called Homebrew.
Installation
To build almost anything on MacOS we need the Xcode developer suite. This is a set of libraries, environment configurations and binaries used at the core of all Apple software products. The full installation can be found on Apple’s developer page (requires a login) but this is an extremely large package requiring ~40Gb of disk space. Luckily there is a much smaller CLI package that just installs the necessary tooling for working with software from the terminal. One of these tools is the Clang compiler. To install GCC you will need the Homebrew, a package manager which will by default install the latest stable version of the GCC formula. If you need a different version you can can check the GCC formula page for available versions. To install these packages, open the ‘Terminal’ app and run:
# Install Xcode CLI tools
$ xcode-select --install

# Install Homebrew
$ /bin/bash -c "$(curl -fsSL https://raw.githubusercontent.com/Homebrew/install/HEAD/install.sh)"

# Add `brew` command to your PATH
$ (echo; echo 'eval "$(${HOMEBREW_PREFIX}/bin/brew shellenv)"') >> ${shell_profile}

# Install GCC
$ brew install gcc cmake
Verifying Installation
To verify the install worked for either GCC or Clang we can run the compiler programs with the version flag and ensure the install has been successful.
# Verify GCC
$ g++-13 --version
g++-13 (Homebrew GCC 13.2.0) 13.2.0
Copyright (C) 2023 Free Software Foundation, Inc.
This is free software; see the source for copying conditions.  There is NO
warranty; not even for MERCHANTABILITY or FITNESS FOR A PARTICULAR PURPOSE.

# Verify Clang
$ clang++ --version
Apple clang version 15.0.0 (clang-1500.0.40.1)
Target: x86_64-apple-darwin22.6.0
Thread model: posix
InstalledDir: /Library/Developer/CommandLineTools/usr/bin
Note
Any details displayed from verifying a given newly installed tool may differ to what is displayed in this book.
Tip
- The name of GNU’s compiler toolchain is ‘GCC’ aka GNU Compiler Collection. This is in contrast to the CLI tool called
gccwhich stands for GNU C Compiler.- The C++ compiler from GCC is called
g++. Make sure to use this command when compiling C++ code.- You must specify the versioned
g++command in order to use the Homebrew version of the command. You can find the default version installed by runningbrew info gcc. We must do this because the regularg++command redirects back to Apple’s Clang implementation.
We will also want a tool to help manage larger projects and allow us to build on different machines from the same source. CMake is one such build tool for C++ projects. It is used to manage different configurations for a projects. You would have already installed CMake when you installed the C++ compilers earlier with Homebrew as we added CMake to the install list. You can verify by running:
$ cmake --version
cmake version 3.25.1

CMake suite maintained and supported by Kitware (kitware.com/cmake).
Hello World
Now that you’ve installed a C++ compiler, its time to write your first C++ program. It is tradition when learning a new programming language to write a program that prints “Hello, world!” to the screen and we’ll be doing the same.
Tip
“Hello, world!” was first introduced as a teaching mechanism for people learning a new programming language in Brian Kernighan’s 1972 “A Tutorial Introduction to the Language B”.
Creating a Project Directory
First, you’ll create a new directory to store you C++ code. It is a good idea to create a ‘projects’ or ‘dev’ directory within your ‘home’ or ‘user’ directory in order to store any project you might develop for this book and beyond. Open a terminal and run the following commands.
Shell Script
mkdir ~/projects
cd ~/projects
mkdir hello_world
cd hello_world
touch main.cxx
PowerShell
New-Item -Path . -Name "projects" -ItemType "Directory"
Set-Location projects
New-Item -Path . -Name "hello_world" -ItemType "Directory"
Set-Location hello_world
New-Item -Path . -Name "main.cxx" -ItemType "File"
Command Prompt
mkdir "%userprofile%\projects"
cd "%userprofile%\projects"
mkdir hello_world
cd hello_world
echo. > main.cxx
Writing and Running a C++ Program
Within this new ‘hello_world’ directory we have created a new file called main.cxx.
This is called a C++ source file. A C++ program is then built from one or more of these
files. We use the file extension *.cxx to denote that this file contains C++ source
code. If a filename contains multiple words the convention is to separate the words with
an underscore eg. hello_world.cxx over helloworld.cxx. Now open the file you have
just created and copy the code from below into the file.
#include <iostream>

auto main() -> int {
  std::cout << "Hello, world!\n";
  return 0;
}
Tip
C++ source files can have various different extensions such as
*.cpp, or*.c++however, for this book the*.cxxstyle will be used. Is also good practice to use the same extension type across a project so no matter which one you use, just be consistent.
Save the file and return to your terminal open to the ~/projects/hello_world directory and run the following commands….
…. on Linux or macOS ….
$ g++ -std=c++17 -o hello_world main.cxx
$ ./hello_world
Hello, world!
…. on Windows ….
:: Must be done in a 'Developer Command Prompt for VS ...'
> cl /std:c++17 /EHsc /Fe: hello_world.exe main.cxx
> .\hello_world.exe
Hello, world!
If you see “Hello, world!” printed on your terminal, congratulations, you’ve officially written your first C++ program!
Note
- You can swap the
g++command with theclang++command if you want to use the Clang compiler instead of the GCC compiler.- The
-std=c++17(GCC/Clang) and/std:c++17flag options specify the compiler to use the C++17 (2017) version of C++. The-o <name>is used to specify the name and/or directory for the compiled program.
Anatomy of a C++ Program
Let’s go into some more detail on the structure of our “Hello, world!” program. The first component to cover is:
auto main() -> int {

}
This declares a function called main. The main function is known as the program’s
entry point, meaning main is the very first function that runs in every executable C++
program. This declaration of main takes no parameters and returns an integer (int).
If there were parameters they would be declared within the parenthesis (). The body of
the function is wrapped in curly braces {}.
The body of the function contains the following two lines:
  std::cout << "Hello, world!\n";
  return 0;
The second line returns a status code from main to the (OS) indicating whether the
program run successfully or not. A status code of 0 indicates the program ran was
successfully with any other value indicating the program failed.
The first line is where the action occurs! We start by accessing the symbol cout from
the namespace std “(usually pronounced stood) using the namespace resolution operator
::. cout is a global character output stream that is linked to stdout ie. your
terminal’s output (you’ll learn more about streams and IO in later chapters).
.
We can push characters through the stream using the << operator where the left argument
must be an output stream and the right argument is a series of characters, numbers or a
string. In this case we are pushing the string literal "Hello, world!\n" through the
stream. We use the \n character to specify a newline to be printed after our string
has been written to the terminal.
You’ll notice that we end the line with a semicolon ;. Semicolon’s are used to indicate
the end of an expression.
Note
The operator
<<has been overloaded for use withcout(and other output streams), as such it is only defined to work with C++’s primitive and standard library types. You would need to provide you own definition for custom types.
You’ll also notice at the top of the file the following line:
#include <iostream>
This is a preprocessor instruction, more specifically it is an instruction use to import
the ‘iostream’ library into our program. This is where the symbol for the cout output
stream comes from. We include libraries by utilising the preprocessor directive
#include which basically copies and pastes the contents of the file indicating within
the <> symbols into our program, which in this case is the file ‘iostream’. Assume this
file’s location (and the location of any others used in the same manner) is known to your
compiler unless specified otherwise. Files imported using #include are known as
headers.
Compiler Flags
Compilers have a great many flags that you can provide to turn or off certain features, compile in a different mode or introduce instrumentation to track various properties about program or library. Because each compiler has different options and specifies them in different ways, there is no universal set of flags that you can specify to all compilers and because of how many options there are, it would be ludicrous to try and outline them all here. However, it is good practice to turn on all the warnings such that you can identify problematic code and remove it when appropriate.
GCC and Clang have an almost identical set of flags with MSVC being the outlier. The flags I’d highly recommend specify whenever compiling C++ is as follows for each of the compilers.
GCC and Clang
-Wall- Turn ‘all’ warnings on-Wextra- Turn ‘extra’ warnings on-Werror- Turn warnings into errors (very harsh)-Wpedantic- Ensure strict ISO C++ Standard is Followed
g++ -std=c++17 -Wall -Wextra -Werror -Wpedantic -o hello_world main.cxx
MSVC
/W4- Warning Level 4
cl /std:c++17 /W4 /EHsc /Fe: hello_world.exe main.cxx
Compiling and Running Are Separate Steps
You may notice that it took two separate steps in order to run our program. This is because C++ is a compiled language, meaning that our source code is transformed into something else. In the case of C++, the compiler will generate binary machine code for our target platform; which in this case is our own device before running. This means the generate (machine) code is specific to the target and you cannot transferred and run on a different computer if its architecture is different. This allows the compiler to optimise your code for the target platform but does require the additional step.
This is in contrast to interpreted languages; like Python, Ruby, JavaScript etc., which will perform the conversion while the program is running but this in turn requires another program; the interpreter, to run alongside yours, taking up extra resources but it usually means your programs are more portable as they can run on anywhere the interpreter can. These are some trade-offs made when designing or using a language.
For simple programs, directly using a C++ compiler (like g++) is fine, but as your
project grows you’ll want to manage all the options and make it easy to share your code.
Next, we’ll introduce you to the CMake tool, which will help you write manage much larger
projects.
Hello, CMake
CMake is a third-party tool used to configure and build C++ projects. While there are other tools like CMake for configuring C++ compiler toolchains, CMake is the most ubiquitous within the C++ community. CMake allows use to define one or more targets that our project produces. Targets can be an executable, library, documentation or even testing. This allows a single project to build many different outputs for different platforms from a single source. Targets can also be consumed by other targets allowing more modular builds.
Adapting our hello_world Project
To start off, go back to your projects/hello_world directory and create a new file
CMakeLists.txt.
cd ~/projects/hello_world
touch CMakeLists.txt
Set-Location projects/hello_world
New-Item -Path . -Name "CMakeLists.txt" -ItemType "File"
cd ~/projects/hello_world
echo. > CMakeLists.txt
CMake Configuration Files
A CMake project is defined by a set of ‘CMakeLists.txt’ files located in the source tree
(directories containing your source code). These describe your projects targets, source
files etc.. For a simple single file project we only need a single ‘CMakeLists.txt’
alongside our main.cxx source file. Copy the contents from below.
cmake_minimum_required(VERSION 3.22)

project(hello_world
    VERSION 0.1.0
    DESCRIPTION "Hello, CMake!"
    LANGUAGES CXX)

add_executable(hello_world main.cxx)
target_compile_features(hello_world PRIVATE cxx_std_17)
Let’s break down our CMakeLists.txt file. First we specify the minimum required version
of CMake this project uses. This helps to ensure that any CMake features used in the
projects configuration are available to end users and collaborators.
cmake_minimum_required(VERSION 3.22)
We then define the basic information about our project such as its name, description, version and what languages it uses.
project(hello_world
    VERSION 0.1.0
    DESCRIPTION "Hello, CMake!"
    LANGUAGES CXX)
In order to mark our main.cxx as an executable we use the add_executable() function
where we specify the executable’s name ie. the name of the target created from the
executable as well as the source file used to make the executable.
add_executable(hello_world main.cxx)
Finally, we can add compilation features; such as setting the C++ Standard to use for
building the target, using the target_compile_features() function. Here we add the
builtin CMake feature cxx_std_17 to our executable which ensures it is built using the
2017 C++ Standard.
target_compile_features(hello_world PRIVATE cxx_std_17)
Tip
See Appendix C for more information on C++ Standards.
Building and Running a CMake Project
When building a CMake project we have to perform two steps. The first step is to configure the project. What this does is generate the build recipe(s) for your project according to your ‘CMakeLists.txt’ files. A recipes are the instructions used to actually compile your project with a single recipe being used to build one or more targets. CMake then builds one or more of these targets according to a recipe.
For our project we only have a single target which also happens to correspond to our single preset so we can simply run the following to build our recipe.
$ cmake -S . -B build
-- The CXX compiler identification is GNU 11.4.0
-- Detecting CXX compiler ABI info
-- Detecting CXX compiler ABI info - done
-- Check for working CXX compiler: /usr/bin/c++ - skipped
-- Detecting CXX compile features
-- Detecting CXX compile features - done
-- Configuring done
-- Generating done
-- Build files have been written to: /home/user/projects/hello_world/build
We can then build the target using the following command:
$ cmake --build build
[ 50%] Building CXX object CMakeFiles/hello_world.dir/main.cxx.o
[100%] Linking CXX executable hello_world
[100%] Built target hello_world
This will produce a binary called hello_world in the build/ directory on Linux and
macOS and the build/Debug/ directory on Windows. We can run our program like normal.
$ ./build/hello_world  # ... or .\build\Debug\hello_world.exe on Windows
Hello, World!
Tip
The reason for Windows based builds having an additional intermediate directory
Debug/for the output is because the underlying builder(s) used on Windows can be configured to output both debug and release builds from the same recipe which is controlled with CMake’s--config=<config>flag during the build step. You can test creating a ‘Release’ build by running the following command which should now produce and executable in thebuild\Release\directory.cmake --build build --config=Release
Adding Compiler Flags to CMake Build
Remember in the previous chapter how I stated that it is good to specify warning flags in your C++ builds to catch common bugs. We seem to have abandoned them when introducing CMake, do not fret, we will reinstate them now.
cmake_minimum_required(VERSION 3.22)

project(hello_world
    VERSION 0.1.0
    DESCRIPTION "Hello, CMake!"
    LANGUAGES CXX)

add_executable(hello_world main.cxx)
target_compile_features(hello_world PRIVATE cxx_std_17)

if (MSVC)
    # warning level 4
    add_compile_options(/W4)
else()
    # additional warnings
    add_compile_options(-Wall -Wextra -Werror -Wpedantic)
endif()
Yes, CMake has conditionals and yes they look a little weird but this is greatly the extent I will be discussing CMake until chapter 06 when we look multi-file project structures.
“Hello, Godbolt!”
The ability to quickly test and prototype software is extremely useful however, doing so in C++ is not so easy. There’s a lot of steps that need to be taken to setup a project correctly which is good for building robust software but can slow the speed of prototyping down to a halt. Luckily there exists a platform called Compiler Explorer also known as Godbolt; which allows you to build sharable C++ programs in the browser. Here is an example “Hello, world!” on Godbolt which shows the generated assembly as well as the output from the executed binary. You can also see the godbolt instance embedded below.
Project: Guessing Game
Let us jump straight into C++ by developing a project together! This will help expose you to some common concepts from C++ and how they are used in an actual program. You’ll learn how create variables, control the flow of your program, take in user input, create functions and more! These concepts will be explored in more detail in future chapters while this one will focus on the fundamentals.
We’ll be implementing a simple number guessing game. The program will generate a random integer between 1 and 100 (inclusive). It will then prompt the user to type in a guess. After the guess is entered the program will indicate whether the guess was too high or to low or a congratulatory message if the user got it right and exit the program.
Setting Up a New Project
To begin, create a new directory in your projects/ directory called guessing_game and
create your main.cxx and CMakeLists.txt files.
mkdir guessing_game
cd ~/projects/guessing_game
touch main.cxx
touch CMakeLists.txt
New-Item -Path projects -Name "guessing_game" -ItemType "Directory"
Set-Location projects/guessing_game
New-Item -Path . -Name "main.cxx" -ItemType "File"
New-Item -Path . -Name "CMakeLists.txt" -ItemType "File"
mkdir guessing_game
cd ~/projects/guessing_game
echo. > main.cxx
echo. > CMakeLists.txt
Our main.cxx file can just be an empty main() function for now and our
CMakeLists.txt is basically the same as in “Hello, World!” with only some input values
changed to reflect this mini-project.
auto main() -> int {
    return 0;
}
cmake_minimum_required(VERSION 3.22)

project(guessing_game
    VERSION 0.1.0
    DESCRIPTION "Number Guessing Game"
    LANGUAGES CXX)

add_executable(guessing_game main.cxx)
target_compile_features(guessing_game PRIVATE cxx_std_17)

if (MSVC)
    # warning level 4
    add_compile_options(/W4)
else()
    # additional warnings
    add_compile_options(-Wall -Wextra -Wpedantic)
endif()
Processing a Guess
First we will need to we need to ask the user for input, process that input and ensure it is in a form we expected. To start we’ll simply take in the users guess and return it to them.
#include <iostream>
#include <string>

auto main() -> int {
    std::cout << "Guessing Game!\n";
    std::cout << "Please input your guess (1..100): ";

    auto guess = std::string{};
    std::getline(std::cin, guess);

    std::cout << "You guessed: " << guess << std::endl;

    return 0;
}
Let’s briefly go over the new concepts introduced above. First we have included a new
header <string>1 which contains the definitions the type std::string2 and
supported functions.
#include <string>
We then prompt the user with the name of the game as well as request input from the user
using the output stream std::cout, which we covered in Chapter 1.
    std::cout << "Guessing Game!\n";
    std::cout << "Please input your guess (1..100): ";
Storing Data with Variables
Next, we construct a new variable to store the users input in.
auto guess = std::string{};
Now this is where things begin to get interesting. This line is an assignment expression which is used to bind a value to a variable. Here is another!
auto boxes = 7;
Important
Notice the lack of a type after the
=like when we initialized astd::string. This is because we have initializeboxeswith aintliteral and thus the type is inferred. If you wanted to you could explicitly specify the type as such:auto boxes = int{7};
In C++ variables are mutable by default which means we are allowed to change it’s value.
This concept will be discussed more in
Chapter 3 | Variables and Mutability. To make a
variable constant ie. its value cannot change once it is set, we use the const keyword
after/before auto (I choose after).
const auto boxes = 7;  // constant
auto crates = 4;  // mutable
Tip
The
//syntax indicates a comment that continues until the end of the line. Everything in a comment is ignored by C++. You will learn more about them in Chapter 3 | Comments.
In this case of our variable guess in our guessing game program, we have (default)
constructed a temporary value with the type std::string which we then bind to the
variable named guess using the = operator. We have also used auto to allow the
compiler to deduce the type that the variable guess should have. We could have written
explicitly the type on the left-hand-side instead of auto like the example below but
this would be more verbose as we have to express the type twice. It also means that if
we change the type on the RHS we must also change it on the LHS but with auto the
compiler will do that for us!
std::string input = std::string{};
Tip
When constructing our
std::stringwe have used what is known as brace initialization. This is a modern (C++11) method for initializing objects and is used to avoid the narrowing of types. The empty{}indicates we a constructing the object in its default state, which forstd::stringis an empty string.
Receiving User Input
There are a few different ways for handling user input from the terminal in C++. For this
program we have used the std::getline()3.
std::getline(std::cin, input);
This function extracts all characters from the first argument which is of type
std::basic_istream<>4. In this case, the input stream is std::cin5. Once no
characters remain in the stream or the designated deliminator is encountered; which
defaults to '\n' (third argument), the extracted characters are then written to the
second argument which is a reference to a string of the same underlying character type.
References allow functions to read and/or modify data passed to them and have the effects
reflected on the callers side. We’ll cover references and ownership in C++ during
Chapter 4. In effect this function reads an entire line
and copies the characters into a string.
Printing with Output Streams
As we first saw in “Hello, world!” we can output text using
std::cout6 global object using the operator <<7. You may be wondering why the
“unique” syntax for out has been chosen for printing? This is because the
Input/Output8 library is more generic than just a printing facility. As the name
suggests it is a library for manipulating and using Input/Output (IO) streams. Streams
can be thought of as a pipeline between two endpoints eg. a program and the terminal
screen where data can be pushed from one end (the program) and extracted at the other end
(the terminal screen). The C++ IO library uses streams to model how data is transferred
between various endpoints like a program, the terminal screen, files etc. with the <<
and >> operators being used to perform formatted IO ie. push formatted data to and/or
extract formatted data from a stream respectively. These facilities were then used to
wrap low level IO handles such as stdin, stdout and stderr; which are used to print
and take user input, in global stream objects eg. std::cin, std::cout and std::cerr
which meant they could be manipulated using the same API and functionality provided by
the standard C++ IO library.
Note
The C++23 Standard includes a new header
<print>9 with functions likestd::println()which use the C++20 formatting library10 which make printing much more intuitive and faster. This library was directly inspired by the{fmt}library.
If you are familiar with other languages you may be wondering why << is used to push to
a streams as this operator is normally used for the left bit shifting11 operations.
We are able to use the << operator because it has been overloaded. Essentially this
means the functionality of << has been changed and customized for particular types.
Within the C++ standard library, << has been overloaded to support taking a reference
to a std::basic_ostream<>12 object as the left argument; ie. the type of
std::cout, and various builtin C++ types and library types from the standard library as
the right argument eg. int and std::string, which allows the << syntax to be used
with many different types already in C++. Overloading will be covered in more detail in
Chapter 3 | Functions.
In this program we have seen that we can chain the calls to <<.
std::cout << "You guessed: " << input << std::endl;
This is because each call to << returns a reference to the same stream passed as the
left argument, allowing you to make subsequent calls to << one after another. This can
make it easier to build up pipelines to and from streams as we can create arbitrarily
long chains.
Finally, you may notice the std::endl at the end of the chain. This is a
stream manipulator. Stream manipulators are used to modify the stream to support
different kinds of formatting. In this case, std::endl simply appends a '\n' to the
stream and flushes the underlying buffer. So why not just use '\n'? Well, you should.
Using std::endl repeatedly just to add newlines will dramatically degrade performance
because repeatedly flushing the internal buffer forces the OS the immediately display the
characters instead of allowing for the output to buffer ie. reach a large enough size to
warrant making a system call. std::endl should only be used when you want to flush the
streams buffer and place a newline eg. at the end of a program, otherwise use an explicit
'\n'.
Generating a Secret Number
Now we want some way to generate a secret number that the player will try to guess. We
also want the number to be different each time so the game is more fun but we’ll keep it
between 1 and 100 to ensure it is not too difficult. To generate our secret number we’ll
use a random number generator. The C++ standard library contains a header <random>13
which contains a bunch of facilities for generating random numbers. Update your
main.cxx file according to the snippet below.
#include <iostream>
#include <random>
#include <string>

auto main() -> int {
    std::cout << "Guessing Game!\n";

    auto rd = std::random_device{};
    auto gen = std::mt19937{rd()};
    auto distrib = std::uniform_int_distribution<unsigned>{1u, 100u};
    const auto secret_number = distrib(gen);

    std::cout << "The secret number is: " << secret_number << '\n';
    std::cout << "Please input your guess: ";

    auto input = std::string {};
    std::getline(std::cin, input);

    std::cout << "You guessed: " << input << std::endl;

    return 0;
}
First we include the new header <random>13 so we can access the (pseudo-) random
number generation types. Next we add the lines
    auto rd = std::random_device{};
    auto gen = std::mt19937{rd()};
    auto distrib = std::uniform_int_distribution<unsigned>{1u, 100u};
The first line (default) constructs a new std::random_device14. This is a uniformly
distributed, non-deterministic number generator. While we could generate a random number
from simply calling rd, this is considered bad practice as std::random_device14
performance degrades with use due to its entropy pool being used up. For this reason we
simply use it to seed a proper Pseudo-Random Number Generator (PRNG) such as
std::mt1993715 which is what we do on the second line. Finally we construct a
std::uniform_int_distribution<>16 which is used to uniformly generate integers
between the two provided bounds.
This sets up our random number generator. To obtain a random number we can call the distribution object, passing in the generator and returning a new random value.
const auto secret_number = distrib(gen);
Comparing the Guess to the Secret Number
Next we want to compare our players guess to the secret number.
#include <compare>
#include <iostream>
#include <random>
#include <string>

auto main() -> int {
    std::cout << "Guessing Game!\n";

    auto rd = std::random_device{};
    auto gen = std::mt19937{rd()};
    auto distrib = std::uniform_int_distribution<unsigned>{1u, 100u};
    const auto secret_number = distrib(gen);

    std::cout << "The secret number is: " << secret_number << '\n';
    std::cout << "Please input your guess: ";
    auto input = std::string{};
    std::getline(std::cin, input);
    auto guess = std::stoi(input);

    if (guess == secret_number) {
        std::cout << "You guessed correctly!\n";
        break;
    } else if (guess < secret_number) {
        std::cout << "Too small!\n";
    } else if (guess > secret_number) {
        std::cout << "Too big!\n";
    }

    return 0;
}
Before we are able to compare the players input to our secret number we must first convert the raw input into a number so they can be compared.
auto guess = std::stoi(input);
C++ offers a few functions for converting strings into numbers which all start with the
prefix std::sto*17 meaning ‘string-to’ followed by a designator for the conversion
type. Because we want to parse our input as a plain int we can use std::stoi().
Next we compare the guess to our secret_number. We use if and else if18
branches to test the ordering of the two numbers and run a separate piece of code
depending on which condition is true.
    if (guess == secret_number) {
        std::cout << "You guessed correctly!\n";
        break;
    } else if (guess < secret_number) {
        std::cout << "Too small!\n";
    } else if (guess > secret_number) {
        std::cout << "Too big!\n";
    }
Handling Parsing Errors with Exceptions
Our game is coming along quite nicely but it has one fundamental flaw. What happens if we give our game the input “abcd34” or “38574876546456476745”? We get the following two errors and our game crashes!
# input: "abcd34"
terminate called after throwing an instance of 'std::invalid_argument'
  what():  stoi
[1]    27989 IOT instruction  ./build/.../guessing_game

# input: "38574876546456476745"
terminate called after throwing an instance of 'std::out_of_range'
  what():  stoi
[1]    1513 IOT instruction  ./build/.../guessing_game
This is not ideal as it gives no way for the system to recover from the error and let the
user try again. How do we fix this? Well notice in the error message it states that an
instance of (either) std::invalid_argument19 (or) std::out_of_range20 was
thrown. What are these objects? These are known as exceptions. They are a special object
used to indicate that an exceptional event has occurred. These are pathways in our
program that we do not expect to occur but might and exceptions allow us to recover the
system without fully crashing. This is a useful mechanism for allowing systems to remain
online and perform self recovery if an error does occur.
Before we look at how to handle thrown exceptions we’ll first discuss what each of these
exceptions mean in the context of std::stoi()17. std::invalid_argument19 is
used to indicate that a general parsing error has occurred due to a bad input ie.
prefixing the input with letters eg. “abcd34”. The exception std::out_of_range20 is
used to indicate that the input value cannot fit into the conversion type. For example if
“38574876546456476745” is passed to std::stoi()17 we have this exception thrown
because the max value that can be fit inside an int is 2147483647 which is much
smaller than 38574876546456476745.
Tip
The
std::sto*function family will ‘successfully’ parse inputs like “34abc” as they extract the number from the front and will discard the rest.
Catching Exceptions
So how do we handle an exception that has been thrown? We can use a try-catch block.
When there is a chance for something to fail we place the potentially failing code
in a try block21. After a try block we put one or more catch blocks22. These
are used to define the exception handling pathway for that particular exception.
// --snip--
#include <exception>
#include <iomanip>
#include <iostream>
#include <random>
#include <string>

auto main() -> int {
    // --snip--
    std::cout << "Guessing Game!\n";

    auto rd = std::random_device{};
    auto gen = std::mt19937{rd()};
    auto distrib = std::uniform_int_distribution{1, 100};
    const auto secret_number = distrib(gen);

    std::cout << "The secret number is: " << secret_number << '\n';
    std::cout << "Please input your guess: ";
    auto input = std::string{};
    std::getline(std::cin, input);

    auto guess = int{0};

    try {
        guess = std::stoi(input);
    } catch (const std::invalid_argument&) {
        std::cerr << "Invalid input " << std::quoted(input) << "!\n";
        std::exit(0);
    } catch (const std::out_of_range&) {
        std::cerr << "Input " << std::quoted(input) << " is too large!" << '\n';
        std::exit(0);
    }

    // --snip--

    if (guess == secret_number) {
        std::cout << "You guessed correctly!\n";
        break;
    } else if (guess < secret_number) {
        std::cout << "Too small!\n";
    } else if (guess > secret_number) {
        std::cout << "Too big!\n";
    }

    return 0;
}
Warning
While
try-catchblock’s do model a form of control flow they are very different to regular control flow mechanisms likeifstatements. You should not be usedtry-catchblocks to control the regular/expected execution pathway of a program as they are much slower nor should you throw exceptions in order to jump out to a particular scope. Exceptions should only be used to indicate that a recoverable error has occurred andtry-catchblocks being used to handle recovering from this event eg. giving any allocated resources back to the OS, as such exceptions should be used only in exceptional (pun most definitely intended) cases and when appropriate for your domain (as they can be undesirable in many situations). The main purpose of showing exceptions now is to demonstrate how to handle them not throw your own.
Allowing Multiple Guesses with a Loop
Now that we correctly handle the exceptional cases of parsing our player’s input we can
look at making the game more interactive. Only having one guess doesn’t make our game
very fun. Lets allow the player to make multiple guesses by introducing a loop! We will
want this loop to run forever with explicit mechanisms for exiting the loop. We can use
a while loop with its condition simply being true. This will create our infinite
loop. But how and when do we exit the loop? We want the loop to be broken when the player
guesses the correct number. We can do this by introducing a break statement in the
first if branch when comparing the player’s input to the secret number. break is used
to break out of the enclosing loop block. We also need the program to run the next loop
iteration if an exception occurs, skipping the comparisons. We can do this with a
continue statement within each of the catch blocks to skip to the next iteration.
Finally, be sure to move the prompt output and player input logic into the loop so they
are called each iteration.
// --snip--
#include <exception>
#include <iomanip>
#include <iostream>
#include <random>
#include <string>

auto main() -> int {
    // --snip--
    std::cout << "Guessing Game!\n";

    auto rd = std::random_device{};
    auto gen = std::mt19937{rd()};
    auto distrib = std::uniform_int_distribution{1, 100};
    const auto secret_number = distrib(gen);

    std::cout << "The secret number is: " << secret_number << '\n';
    auto input = std::string{};
    auto guess = int{0};


    while (true) {

        // --snip--
        std::cout << "Please input your guess: ";
        std::getline(std::cin, input);

        try {
            guess = std::stoi(input);
        } catch (const std::invalid_argument&) {
            std::cerr << "Invalid input " << std::quoted(input) << "!\n";
            continue;
        } catch (const std::out_of_range&) {
            std::cerr << "Input " << std::quoted(input) << " is too large!" << '\n';
            continue;
        }

        if (guess == secret_number) {
            std::cout << "You guessed correctly!\n";
            break;
        } else if (guess < secret_number) {
            std::cout << "Too small!\n";
        } else if (guess > secret_number) {
            std::cout << "Too big!\n";
        }
    }

    return 0;
}
Fantastic! With a final tweak we have finished the guessing game. Our game is still printing the secret number! We can fix this by deleting the line. The final code is available below.
#include <exception>
#include <iomanip>
#include <iostream>
#include <random>
#include <string>

auto main() -> int {
    std::cout << "Guessing Game!\n";

    auto rd = std::random_device{};
    auto gen = std::mt19937{rd()};
    auto distrib = std::uniform_int_distribution{1, 100};

    const auto secret_number = distrib(gen);
    auto input = std::string{};
    auto guess = int{0};

    while (true) {
        std::cout << "Please input your guess: ";
        std::getline(std::cin, input);

        try {
            guess = std::stoi(input);
        } catch (const std::invalid_argument&) {
            std::cerr << "Invalid input " << std::quoted(input) << "!\n";
            continue;
        } catch (const std::out_of_range&) {
            std::cerr << "Input " << std::quoted(input) << " is too large!" << '\n';
            continue;
        }

        if (guess == secret_number) {
            std::cout << "You guessed correctly!\n";
            break;
        } else if (guess < secret_number) {
            std::cout << "Too small!\n";
        } else if (guess > secret_number) {
            std::cout << "Too big!\n";
        }
    }

    return 0;
}
Summary
This project offered a hands on way to learn many of C++ features: auto, variables,
functions, if statements, exception handling and loops! In the upcoming chapters you
will delve deeper into these concepts as well as explore many new ones. See you there!
-
https://en.cppreference.com/w/cpp/string/basic_string/getline ↩
-
https://en.cppreference.com/w/cpp/io/basic_ostream/operator_ltlt ↩
-
https://en.wikipedia.org/wiki/Bitwise_operation#Bit_shifts ↩
-
https://en.cppreference.com/w/cpp/numeric/random/random_device ↩ ↩2
-
https://en.cppreference.com/w/cpp/numeric/random/mersenne_twister_engine ↩
-
https://en.cppreference.com/w/cpp/numeric/random/uniform_int_distribution ↩
-
https://en.cppreference.com/w/cpp/string/basic_string/stol ↩ ↩2 ↩3
-
https://en.cppreference.com/w/cpp/error/invalid_argument ↩ ↩2
Common Programming Concepts
Throughout this chapter we will cover some of the most common concepts that appear in many different programming languages and how they work in C++. None of these concepts are unique to C++ but they may work slightly different to how you are used to.
Important
Keywords are words reserved for use by the language meaning they cannot be used as identifier names for variables or functions. See Appendix A for full list of keywords.
Variables and Mutability
We first saw variables in our mini guessing game project where we used them to store the guess of the user and create our PRNG etc.. Let’s explore what happens when we try to modify constant data and when we would want to allow mutations.
Create a new project have done before, with a main.cxx and CMakeLists.txt and add the
following contents. This will act as out scratchbook project for tinkering with examples.
I won’t always go into super detail about what changes will be made between various
topics but most examples will have a full example with some being hidden behind snips
which can be exposed using the ‘eye’ button in a codeblock.
cmake_minimum_required(VERSION 3.22)

project(main
    VERSION 0.1.0
    DESCRIPTION "C++ Book Examples"
    LANGUAGES CXX)

add_executable(main main.cxx)
target_compile_features(main PRIVATE cxx_std_17)

if (MSVC)
    # warning level 4
    add_compile_options(/W4)
else()
    # additional warnings
    add_compile_options(-Wall -Wextra -Wpedantic)
endif()
#include <iostream>

auto main() -> int {
    return 0;
}
Declaring Variables and Constants
To start with we will explore how your declare variables and constants and what happens
when you try to change the value for each. Below outlines a program that declares a
constant with the name x and assigns it the value 42 and displays the result. Very
straight forward, basically the same as ‘Hello, world!’. We then reassign x to 43 and
print the result. The question is, would this compile? Let’s take a look.
#include <iostream>

auto main() -> int {
    const auto x = 42;
    std::cout << x << "\n";

    x = 43;
    std::cout << x << "\n";

    return 0;
}
When we try to compile the above we should get an error like so:
$ cmake -S . -B build
...
$ cmake --build build
[ 50%] Building CXX object CMakeFiles/main.dir/main.cxx.o
/home/user/projects/common/main.cxx: In function ‘int main()’:
/home/user/projects/common/main.cxx:7:7: error: assignment of read-only variable ‘x’
    7 |     x = 43;
      |     ~~^~~~
gmake[2]: *** [CMakeFiles/main.dir/build.make:76: CMakeFiles/main.dir/main.cxx.o] Error 1
gmake[1]: *** [CMakeFiles/Makefile2:83: CMakeFiles/main.dir/all] Error 2
gmake: *** [Makefile:91: all] Error 2
The answer is a definitive no. Why? Because x in this program is a constant meaning its
value does not change over its lifetime. If x is meant to change we drop the const
keyword, allowing x to be mutated and thus making it a variable.
#include <iostream>

auto main() -> int {
    auto x = 42;
    std::cout << x << std::endl;

    x = 43;
    std::cout << x << std::endl;

    return 0;
}
$ cmake -S . -B build
...
$ cmake --build build
...
$ ./build/main
42
43
Type Deduction
It is time to address the elephant in the room, auto. You may be asking;
- “What is this peculiar keyword and why are we declaring constants and variables with it?”
- “I thought C++ was a typed language, where are the types?” etc..
All valid questions and if we are to continue using auto we should address what it is
doing. auto does not introduce dynamically typed variables into C++, the type is
still there it is just inferred by the compiler. This is a mechanism called type
deduction and it allows for the type of many expressions to be resolved by the compiler
rather than the programmer. This feature was introduced with C++11 allows for simpler
expressions to be written in the language.
Take a look at the example below, both lines declare a variable with one explicitly
stating the type of x while the other lets the compiler deduce the type of y for you
but with both variables having the type int.
int x = 5;
auto y = 6;
As discussed in the chapter 02, you can still mark the type of an expression explicit by
making it explicitly known on the right hand side of the equals sign, like we did for
std::string.
int x = 5;
auto y = int{6};
Storage Duration
The primary goal of variables (and constants) is to store data. Whether that be numbers, characters, memory address etc.. How long a variable is around for (known as its lifetime) is determined by where space for the data was made available from and can be labelled by one of three categories known as “storage durations”.
So far we have seen data with automatic storage duration, which means the lifetime of
that data is tied directly to the scope it was declared in. Currently we have only been
working in the scope of the main() function, thus when we return from main(), the
variables we have declared will become unavailable.
Soon we will look at data that has dynamic storage duration. This is data whose lifetime is managed manually by the program and thus by the programmer. You must explicitly request the space for the data and remember to return it once you no longer require it.
These two storage duration categories are often tied to the notion of the stack and the free store respectively. Data with automatic storage duration is allocated on the stack allowing for the usual mechanisms of the stack to handle the allocation and deallocation of the slots used for the data, and the free store being the region in which dynamic data is located.
One we haven’t looked at yet is static storage duration. This is data that is encoded
directly in the binary of a program and thus lives for the entire duration of the
program. To give data this storage duration we declare it with the static keyword.
Global variables declared outside of a functions are implicitly static.
Data Types
The type of a value is important in C++ as it determines the permissible actions that can be performed on the value as well as determine the size of the value in memory. C++ has a great many types but we’ll begin by looking at some of the most simple, ones you will find in every program your read or write.
Scalar Types
Scalar integrals are types encoded as whole numbers. This not only includes integers types but C++ character and Boolean types.
Integer Types
An integer is a whole number. C++ has a few different integer types which have
different bit widths. The default int is 32-bits wide on most platforms. By default
integer types are signed ie. they can represent both positive and negative numbers. If
you need unsigned numbers we can use the unsigned qualifier.
const int x = -5;
const unsigned int y = 5;
If you need integers of a different sizes you can either use size qualifiers with the
int type to dictate the minimum size the integer can be. All of these can be used in
combination with the unsigned qualifier.
| Type | Full Type | Minimum Size | Signed Value Range | Unsigned Value Range |
|---|---|---|---|---|
char |
char |
at least 8 | -128 to 127 | 0 to 255 |
short |
short int |
at least 16 | -32,768 to 32,767 | 0 to 65,535 |
int |
int |
at least 16 | -32,768 to 32,767 | 0 to 65,535 |
long |
long int |
at least 32 | -2,147,483,648 to 2,147, 483,647 |
0 to 4,294, 967,296 |
long long |
long long int |
at least 64 | -9,223,372,036,854,775,808 to 9,223,372,036,854,775,807 |
0 to 18,446,744,073,709,551,615 |
You can also use fixed width integer types (FWIT). FWIT have the form std::intN_t or std::uintN_t where N is the exact number of bits wide. The standard library define FWIT (signed and unsigned) for 8, 16, 32, 64 bits widths.
The bit width of an integer dictates how many values the integer can represent. As of C++20, all integers must be represented by 2s-complement which means that for signed numbers the range of values is \(-2^{N-1}\) to \(+2^{N-1}-1\) eg. -128 to 127 for an 8-bit number and for an unsigned number the range is \(2^N-1\) eg. values 0 to 255 for an 8-bit number.
In addition to these integer types there are std::size_t and std::ptrdiff_t which
are the unsigned and signed types respectively that have the max bit width available on a
given architecture, eg. 64 bits on 64-bit architecture. std::size_t is the type used
when indexing arrays or getting the size of objects.
Literals
Literals are the symbols that represent an actual value in C++ source code. They are
mostly used to initialize a variable. For example, 1 is an integer literal of type
int while "Hello" is a string literal of type const char* (ignore the meaning of
this type for now).
Literals can have a suffix operator applied to specify the literal has a specific type
or bit width. Some can be used in combination with others such as the u literal suffix
on integer literals.
| Keyword | Description |
|---|---|
u or U | unsigned |
l or L | long |
ll or LL | long long |
Additionally you can write integer literals in a different base form by changing the prefix of the literal.
const auto decimal = 42;
const auto octal = 052;
const auto hex = 0x2a;
const auto Hex = 0X2A; // capital hex digits
const auto binary 0b101010;
Integers can also be separated using a ' to make large numbers easier to read.
const auto x = 1'234'567'890;
Character Types
You’ll notice that we have included the char type in the integer list above. This is
because character types in C++ are represented using numbers, specifically char
represents ASCII code points. Character literals are specified with single quotes like
the example below.
const char x = 'a';
const auto y = 'b';
Boolean Type
C++’s Boolean type is called bool and can either hold the value true or false.
Booleans are mostly used in conditional and loop statements eg. if and while.
bool x = false;
auto y = true;
Tip
The C language; C++’s mother language, originally did not have a native Boolean type with Boolean expressions return 1 for
trueand 0 forfalse. Later in the 1999 standard of C (C99), the_Booltype was introduced to support Booleans.
Floating Point Types
C++ has three floating point types, all of which are based on the IEEE-754 standard.
Floating point numbers are used to represent decimal numbers ie. numbers that can store
fractional components. These types are the float, double and long double; with
float represent single precision (32-bit) numbers, double being double precision
(64-bit) numbers and long double being an extended or quadruple precision (128-bit)
floating point number.
All floating point literals have the type of double with the f and l literal suffix
operators specifying a type of float and long double respectively.
const auto f = -0.06f;
const auto d = 47.5768;
const auto l = -655456.457567l;
We can also initialize floating points using exponential form:
const auto f = -6e-2f;
const auto d = 475768e4;
const auto l = -655456457567le7l;
Arithmetic Operations
Integral and floating point types are categorized as arithmetic types which mean they support the common arithmetic operations like addition, subtraction etc.
#include <iostream>

auto main() -> int {
    // addition
    const auto sum = 4 + 6;

    // subtraction
    const auto sub = 10 - 5.5;

    // multiplication
    const auto mul = 5 * 3.2;

    // division
    const auto idiv = 10 / 3;
    const auto fdif = 13.5 / 2.4;

    // remainder
    const auto rem = 23 % 4;

    // --snip--

    std::cout << "sum: " << sum << "\n";
    std::cout << "sub: " << sub << "\n";
    std::cout << "mul: " << mul << "\n";
    std::cout << "idiv: " << idiv << "\n";
    std::cout << "fdiv: " << fdiv << "\n";
    std::cout << "rem: " << rem << "\n";

    return 0;
}
Tip
- Division between two integrals performs integer division and truncates towards 0 while if one argument is a floating point then floating point division is performed.
- Remainder is only valid between integral types.
Compound Data Types
Compound data types store multiple pieces of data or are data that can take multiple values.
Enumerations
Enumerations or enums are a construct that allows you to define a type whose value is
restricted to a set of named variants or enumerators. These named constants have an
underlying integral type. Specifying the underlying type is optional ie. omit the
: type in the enum declaration.
#include <iostream>

enum class colour : char {
    red,
    green,
    blue
};

auto main() -> int {
    const auto col = colour::red;

    // --snip--

    std::cout << "colour internal value is: " << col << "\n";

    return 0;
}
Tuple
Tuples allow you to pack multiple pieces of data of different types into a single
structure. Tuples have a fixed size/number of elements that cannot grow or shrink once
declared. Tuples in C++ are not language types but are provided by the standard library
in the <tuple> header and is called std::tuple. We create a tuple using brace
initialization (top) or using the helper function std::make_tuple().
#include <iostream>
#include <tuple>

auto main() -> int {
    const auto t = std::tuple{5u, 5.34f, -345, "abc", false};
    const auto u = std::make_tuple(5u, 5.f, -345, "abc", false);

    return 0;
}
Tuples can be accessed using std::get<I>(t) with I being the index of the value we
want to access and t is the tuple object.
#include <iostream>
#include <tuple>

auto main() -> int {
    const auto t = std::tuple{5u, 5.34f, -345, "abc", false};
    const auto u = std::make_tuple(5u, 5.f, -345, "abc", false);

    const auto e = std::get<2>(t);  // e := -345

    // --snip--

    std::cout << "2nd tuple element is: " << e << "\n";

    return 0;
}
You can also destructure tuples into its constituent values like so.
#include <iostream>
#include <tuple>

auto main() -> int {
    const auto t = std::tuple{5u, 5.34f, -345, "abc", false};
    const auto u = std::make_tuple(5u, 5.f, -345, "abc", false);

    const auto [v, w, x, y, z] = t;

    // --snip--

    std::cout << "v: " << v << "\n";
    std::cout << "w: " << w << "\n";
    std::cout << "x: " << x << "\n";
    std::cout << "y: " << y << "\n";
    std::cout << "z: " << z << "\n";

    return 0;
}
There is a specialization of tuples called std::pair found in the <utility> header
which holds just two values. The values of a pair can be extracted using the same methods
as tuples but they also have public members std::pair::first and std::pair::second
which allows you to access the data.
#include <iostream>
#include <utility>

auto main() -> int {
    const auto p = std::pair{5, 'a'};
    const auto [x, y] = p;

    // --snip--

    std::cout << "first: " << p.first << "\n";
    std::cout << "second: " << p.second << "\n";
    std::cout << "x: " << x << "\n";
    std::cout << "y: " << y << "\n";

    return 0;
}
Array Types
C++’s array type is a fixed sized container where every elements is of of the same type
and located contiguously next to each other in memory. Much like other types it is found
in the std namespace and is called; as you might of guess std::array, which You can
import from the <array> header. An element in an array can be accessed using the
subscript operator [] or the array::at() method with indices starting at 0. The
subscript operator access does not perform bounds checking while array::at() does,
meaning the latter will throw and exception if an out of bounds index is used while the
former will results in ‘Undefined Behaviour’ which may or may not crash the program.
#include <array>
#include <iostream>

auto main() -> int {
    const auto a = std::array{1, 2, 3, 4, 5};
    const auto e1 = a[0]; // valid
    const auto e2 = a.at(5); // exception std::out_of_range

    // --snip--

    return 0;
}
Functions
Functions are fundamental to programming as they allow us to write reusable pieces of
code. We have already been using a function in the examples we have shown so far, that
is the main() function which is called by our OS to start the program.
Functions are defined by introducing a type (or auto) followed by the functions name,
a(n optional) comma-seperated list of parameters surrounded in parenthesis followed by
the body of the function in (curly-)braces. We call a function through its name and
suffixing parenthesis to it.
#include <iostream>

auto foo() -> void {
    std::cout << "Another one!\n";
    return;
}

auto main() -> int {
    std::cout << "Main function!\n";

    foo();

    return 0;
}
Tip
A function must be declared before it can be used as the compiler has to know the function symbol (name + parameter and return types) exists however, it does not have to defined.
#include <iostream>

// declaration
auto foo() -> void;

auto main() -> int {
    std::cout << "Main function!\n";

    foo();

    return 0;
}

// definition
auto foo() -> void {
    std::cout << "Another one!\n";
    return;
}
Parameters
Parameters are a way to pass information into functions. The type of each parameter must be specified, using the same syntax we saw to declare a variable (without an initializer).
#include <iostream>


auto foo(const int x, const int y) -> void {
    std::cout << "x: " << x << ", y: " << y << "\n";
    return;
}

auto main() -> int {
    std::cout << "Main function!\n";

    foo(7, 6);

    return 0;
}
Return Values
Functions can also return values using the return keyword. The type of the return value
is indicated either before the functions name (C-style) or using a trailing return type,
like we’ve been using for main(). When a function doesn’t a value, it’s return type is
void.
#include <iostream>
#include <sstream>
#include <string>

auto foo(const int x, const int y) -> std::string {
    auto ss = std::stringstream{};
    ss << "x: " << x << ", y: " << y << "\n";
    return ss.str();
}

auto main() -> int {
    std::cout << "Main function!\n";

    std::cout << another_one(7, 6);

    return 0;
}
Overloading
In C++ you can overload functions of the same name to have different implementations as long as the type signature of the function is different. This is because the type signature is part of the functions symbol and thus functions with the same name but different parameters (and possibly return type) is an entirely different function.
#include <iomanip>
#include <iostream>
#include <sstream>
#include <string>
// --snip--

auto another_one(const int x, const int y) -> std::string {
    auto ss = std::stringstream{};
    ss << "x: " << x << ", y: " << y << "\n";
    return ss.str();
// --snip--
}

auto another_one(const float x, const float y) -> std::string {
    auto ss = std::stringstream{};
    ss << std::setprecision(4)
       << "x: "
       << x
       << ", y: "
       << y
       << "\n";

    return ss.str();
}

auto main() -> int {
    std::cout << "Main function!\n";

    std::cout << another_one(7, 6);
    std::cout << another_one(7.456575654f, 6.0f);
    return 0;
// --snip--
This concept also extends to C++ operators, which can also be overloaded to have custom
functionality between custom types. Operators are overloaded using the operator keyword
as the function name, suffixed with the operator we wish to overload. Operator overload
functions can only take two parameters except unary operators, which can only take one.
#include <iostream>
#include <ostream>
#include <utility>
// --snip--

auto operator<<(std::ostream& os, std::pair<int, int> p) -> std::ostream& {
    const auto [x, y] = p;
    os << "x: " << x << ", y: " << y << "\n";
    return os;
}

auto main() -> int {
    const auto p = std::pair{7, 6};

    std::cout << p << "\n";
    return 0;
// --snip--
}
Warning
There are a few operators that cannot be overloaded such as scope lookup (
::), and member access operators (.,->,.*and->*).
Comments
Comments are a way to document code for other people, and yourself. In C++ there are two
types of comments, single line and multi-line. We’ve seen single line comments in many of
the previous examples but to reiterate, a single line comment is started with // and
any text written after it until a newline is ignored by the compiler.
// Comment on its own line

const auto x = 5; // Comment
Multi-line comments are specified using /* */ quoting ie. the comment extends from
/* comment opener and continues until */. This allows comments to extend multiple
lines or be nested amongst code (if you really want).
/*
multi-line comment
another line
*/

const auto /* int */ x = 5;
Control Flow
Control flow is how we get our programs to do interesting things, it allows us to write programs that do different things depending on conditions (branch) or easily repeat code (loops). C++ also has various relational and logical operators used to construct conditional expressions used by the control flow statements. You can read about them in Appendix B.
Branches
if statements
An if statement is the simplest control flow structure, it allows us to execute a piece
of code as long as a condition is true. if statements are declared using the if
keyword followed by the conditional expression in parenthesis. The code to execute is
contained in braces like function definitions.
#include <iostream>
// --snip--

auto main() -> int {
    const auto x = 6;

    if (x % 2 == 0) {
        std::cout << "Even\n";
    }

    return 0;
// --snip--
}
We can add an alternative branch using the else keyword after the closing the brace of
the if the block. This branch will run if the condition in the if statement is
false.
#include <iostream>
// --snip--

auto main() -> int {
    const auto x = 5;

    if (x % 2 == 0) {
        std::cout << "Even\n";
    } else {
        std::cout << "Odd\n";
    }

    return 0;
// --snip--
}
We can create a multiple branches based on various conditions using an else if
statement. These declared after the initial if statement.
#include <iostream>
// --snip--

auto main() -> int {
    const auto x = 5;

    if (x % 2 == 0) {
        std::cout << "Even\n";
    } else if (x % == 5) {
        std::cout << "5 multiple\n";
    } else {
        std::cout << "Odd\n";
    }

    return 0;
// --snip--
}
switch statements
switch statements are a way to mix control flow with enums. switch statements are
given a enum object which are then matched against different cases ie. enum variants.
There is a default case that is used if no case is match, the equivalent of else
from if statements.
The cases of a switch statements automatically fallthrough to the next case if you do
not use a break statement to escape from the switch.
#include <iostream>
// --snip--

enum class colour : char {
    red,
    green,
    blue
};

auto main() -> int {
    const auto c = colour::red;

    switch (c) {
        case colour::red:
            std::cout << "red\n";
            break;
        case colour::green:
            std::cout << "green\n";
            break;
        case colour::blue:
            std::cout << "blue\n";
            break;
        default:
            std::cout << "unknown\n";
            break;
    }

    return 0;
// --snip--
}
Note
Because enums are fundamentally based on an underlying integral type,
switchstatements thus can work on any integral type likecharorinthowever, you have to be sure to cover all the cases as there is no formally notion of pattern matching over integral ranges.
Loops
while loop
while loops are the fundamental looping construct in C++. A while loops will repeat
as long as the condition remains true.
#include <iostream>
// --snip--

auto main() -> int {
    auto i = 0uLL;
    auto acc = 0uLL;

    while (i < 10) {
        acc += i;
        i += 1;
    }

    std::cout << "Sum: " << acc << "\n";

    return 0;
// --snip--
}
There is another while loop called a do-while loop. This has the same semantics as
a while loop but the loop condition is checked at the end of the loop instead of at the
start. This has the effect of running the loop at least once.
#include <iostream>
// --snip--

auto main() -> int {
    auto i = 0uLL;
    auto acc = 0uLL;

    do {
        acc += i;
        i += 1;
    } while (i < 1);

    std::cout << "Sum: " << acc << "\n";

    return 0;
// --snip--
}
for loop
for loops further abstract the concepts of loops by providing dedicated syntax for
initializing the loop counter and incrementing the loop unlike a while loop which only
only has syntax for checking the loop condition. We saw a for loop in our constexpr
example.
#include <iostream>
// --snip--

auto main() -> int {
    auto acc = 0uLL;

    for (auto i = 0; i < 10; i++) {
        acc += i;
    }

    std::cout << "Sum: " << acc << "\n";

    return 0;
// --snip--
}
range-for loop
In C++11, we got another for loop called a range-for loop. This loop is able to
automatically traverse C++ standard container types like array. This is beneficial
as it prevents us from incorrectly accessing/traversing the container ie. indexing out of
the array/containers bounds.
#include <iostream>
#include <array>
// --snip--

auto main() -> int {
    const auto a = std::array{1, 2, 3, 4, 5};
    auto acc = 0uLL;

    for (const auto x : a) {
        acc += x;
    }

    std::cout << "Sum: " << acc << "\n";

    return 0;
// --snip--
}
Ownership
Ownership of data and resources is vital to consider when writing complex and sophisticated programs in C++ (or other systems level programming language) due to needing to manage resources like memory manually. Having a clear picture of who owns what data and who has access to data ensures we write safer programs.
What is Ownership?
Ownership is the notion that some data is managed or owned by a particular variable and thus is responsible for ensuring that it’s data lives long enough for all parts of the program that reference the data can correctly access the data.
We first had a look at lifetimes in Common Concepts - Variables and Mutability when discussing storage duration of data but we are now going to discuss how this comes into effect in our programs.
Important
The Stack and the Heap
You’ll hear a lot about the stack and the heap when discussing C++ but what are they?
These are two regions of memory that your program can access during its execution. The stack is a fixed sized region that is utilised automatically by your program. When variables are created, the data is pushed onto the top of the stack and the stack pointer is incremented by the size in bytes of this newly pushed variable. When that variable is no longer referenceable ie. it goes out of scope, the value is popped off the stack thus deleted the data. Data with automatic storage duration live on the stack and it is where all variables we have shown in the previous examples have been allocated to.
Function calls also interact with the stack in an interesting way. When a function is called the stack creates a new stack frame which encapsulates all the data created during the function call, as well as information about parameters and how to get back to the function’s call site ie. parameter data and return address storage. This is done so that when a function does return, the entire stack frame can be popped off, deallocating all data created during the functions execution.
All in all, the stack is super fast and automatic allocates and deallocates memory for us thus allowing the lifetime of variables to be computed by the compiler, not us! So why don’t we always use the stack? We can’t because the stack is a fixed size and cannot grow beyond its original capacity which usually isn’t very large because our OS wants to allow lots of programs to be able to run at once.
This is where the heap comes in. The heap is slow but dynamic memory that our program requests at runtime. This allows us to create variable sized memory regions that we can grow and shrink as need be however, this comes at the cost of having to manually return this memory back to the OS otherwise it is leaked! This means we have to track the lifetime of the data we create and ensure it is freed correctly. Data of this kind is categories as having dynamic storage duration.
Scope
Scopes define what set of symbols and objects are valid to reference in our program. We’ve encounter quite a few different uses of scope in our travels this far. The obvious one being functions. Functions create an entirely new scope that isn’t just semantic (ie. only enforced by the compiler for correctness sake) but have an effect on the execution of a program. When a function is called it allocates a new stack frame meaning the lifetime of all data creating in that function is bound to that function’s lifetime.
We also can see scope with conditional statements like for and range-for loops as the
initializer and iterator for each statement type respectively is only bound to the scope
of the statement body. In fact, you can introduce an unnamed scope using a brace block.
{
    const auto x = 5;

    // do stuck with x
}
// x out of scope
So how do we share data? In C++, variables have copy semantics and what this means is
that the data of an object is copied when we bind a new variable to an existing
variable. We can see this in the play below with y being assigned the value of x not
x itself and thus the address of each object is unique.
#include <iostream>
// --snip--

auto main() -> {
    const auto x = 5;
    const auto y = x;

    std::cout << &x << "\n";
    std::cout << &y << "\n";
    return 0;
}
// --snip--
Tip
Notice the addresses of
xandyare only 4 bytes apart, this is because they are right next to each other on the stack as we discussed above.
The std::string Type
So what happens when data on the heap goes out of scope? To demonstrate what happens we
need to introduce the std::string type. string is more complex than the type
introduced in Common Concepts - Data Types
as it allocates its data on the heap and can change its size during runtime, as opposed
to string literals which are encoded directly into the compiled binary. We even saw
string in our guessing game!
Note
String literials are declared using a pair of double quotes (
"") to surround the text and is of the type of a pointer to the first character (const char*).
So how can we ensure that the memory allocated on the heap is automatically freed when
the variable goes out of scope? Some languages use a Garbage Collector (GC) to clean up
memory that hasn’t been used recently. In C++ we do not have a GC so it is our
responsiblility to identify when memory is no longer needed or is it? C++ uses a concept
known as Resource Acquisition Is Initialization or RAII. In essence it is the idiom
of binding the lifetime of a resource; like memory, to the variable or object that own
it and thus allowing for the resource to be freed when the owning variable goes out of
scope. This is how string; and any other standard library containers, works.
#include <iostream>
#include <string>
// --snip--

auto main() -> {
    {
        const auto s = std::string {"hello"};

        // s is in scope
    }
    // s out of scope and data freed

    return 0;
}
// --snip--
References and Moves
Reference Semantics
So how do dynamic objects like string interact with C++ copy semantics? Well, they obey
the same rules, the data is copied into a new heap location, creating two distinct
objects.
#include <iostream>
#include <string>
// --snip--

auto foo(const std::string s) {
    std::cout << "Address of s: " << static_cast<const void*>(s.data()) << "\n";
}

auto main() -> int {
    const auto s = std::string{"hello"};

    std::cout << "Address of s: " << static_cast<const void*>(s.data()) << "\n";

    foo(s);

    return 0;
// --snip--
}
This is fine for primitive values that are small in size eg. int, bool etc.
which are small but a string can get really big and copying it’s data every time; when
say pass it to a function, takes \(O(n)\) time. What if we could refer to the same data
without copying it? This is where references come into effect. As their name suggests
reference allow us to refer to another object and treat ourselves as said object.
References are declared by suffxing an ampersand (&) to a type declaration on a
variable or parameter.
#include <iostream>
#include <string>
// --snip--

auto foo(const std::string& s) {
    std::cout << "Address of s: " << static_cast<const void*>(s.data()) << "\n";
}

auto main() -> int {
    const auto s1 = std::string{"hello"};
    const auto& s2 = std::string{"hello"};

    std::cout << "Address of s: " << static_cast<const void*>(s.data()) << "\n";
    std::cout << "Address of s: " << static_cast<const void*>(s.data()) << "\n";
    foo(s2);

    return 0;
// --snip--
}
Note
Binding a referencing to another reference doesn’t create a reference to a reference. This is because references pass information through themselves thus the new reference points the original object.
References have a few special semantics, for one references; once bound, cannot be rebound and thus will refer to the same object for the references lifetime. References can also not refer to nothing, they must be bound at construction. This makes references super effective at sharing data safely however, you do have to be careful as C++ does not guarantee a reference does not outlive the object it refers to and thus you can have a dangling reference which refers to a non-existent object and is invalid to use.
This is particularly important to consider when returning references from functions as we as programmers must ensure the object being referred to is not cleaned up when the function returns.
#include <iostream>
#include <sstream>
#include <string>
// --snip--

auto foo(const std::string& s) -> const std::string& {
    auto ss = std::stringstream{};
    ss << "Address of s: " << static_cast<const void*>(s.data()) << "\n";
    return ss.str(); // error: returning reference to temporary
}

auto main() -> int {
    const auto s = std::string{"hello"};

    std::cout << "Address of s: " << static_cast<const void*>(s.data()) << "\n";
    std::cout << foo(s);

    return 0;
// --snip--
}
cmake -S . -B build --preset=<platform>
cmake --build build
[ 50%] Building CXX object CMakeFiles/main.dir/main.cxx.o
/home/user/projects/ownership/main.cxx: In function ‘const std::string& foo(const std::string&)’:
/home/user/projects/ownership/main.cxx:9:18: error: returning reference to temporary [-Werror=return-local-addr]
    9 |     return ss.str(); // error: returning reference to temporary
      |            ~~~~~~^~
cc1plus: all warnings being treated as errors
gmake[2]: *** [CMakeFiles/main.dir/build.make:76: CMakeFiles/main.dir/main.cxx.o] Error 1
gmake[1]: *** [CMakeFiles/Makefile2:83: CMakeFiles/main.dir/all] Error 2
gmake: *** [Makefile:91: all] Error 2
If you need to return something out of a function and it was allocated in the lifetime of the function and won’t exist beyond the function, the return type should not be a reference but a plain value.
Move Semantics
C++ has another method for control data ownership called move semantics which allows
you to transfer ownership of data to another object. This will leave the previously
owning object in a default initialized state or its empty state. Moves; contrary to the
name, moves don’t move data but rather transfer ownership of data. To make a object
movable we need to turn it into what is called an x-value expression ie. a temporary
value, such that the compiler can correctly resolve the move. This is done with the
std::move() function found in the <utility> header.
#include <iostream>
#include <string>
#include <utility>
// --snip--

constexpr auto str_addr(const std::string& s) -> const void* {
    return static_cast<const void*>(s.data());
}

auto main() -> int {
    auto s1 = std::string{"hello this is a really long string"};
    std::cout << sizeof(s1) << "\n";

    std::cout << "String: " << s1 << " | addr: " << str_addr(s1) << "\n";
    const auto s2 = std::move(s1);

    std::cout << "String: " << s1 << " | addr: " << str_addr(s1) << "\n";
    std::cout << "String: " << s2 << " | addr: " << str_addr(s2) << "\n";

    return 0;
// --snip--
}
Note
We have to make
s1non-constto see the behaviour I specified above because ifs1wereconstdeleted the stored data would violate the invariant thats1isconstas we would have mutated it thusconstdata will invoke a copy not a move.This restriction is due to moves not being destructive in C++ which would mean
s1would become an invalid object and generate a compiler warning if we accessed it after moving from it.
The span and string_view types
string_view
Often we want to reference only part of a string, in the past we would use
string::substr() however this would return a newly allocated string so in C++17 we
got std::string_view which is a reference to a series of characters however, it does
not own the characters. string_view has almost all the same operations as string
which makes it super versatile as a string substitute when needing to reference part of
a string.
#include <iostream>
#include <string>
#include <string_view>
// --snip--

auto main() -> int {
    auto s = std::string("hello");
    auto sv = std::string_view(s.data() + 1, 3);

    std::cout << s << "\n";
    std::cout << sv << "\n";

    return 0;
// --snip--
}
Note
The
string::data()method is used to get the address of the first element in astringthus we can use it to get the starting address of our substring by offsetting it by the correct number of characters as seen above.
We can also use string_view to handle string literals, these are the strings we
create using double quotes (""). This makes string literals; which previously was just
an address to the character data, much easier to use and much closer to strings, with
the constraint that you cannot modify this text.
#include <iostream>
#include <string>
#include <string_view>

using namespace std::literals;

auto main() -> int {
    auto sv1 = std::string_view{"hello"};
    auto sv2 = "bye"sv;

    std::cout << sv1 << "\n";
    std::cout << sv2 << "\n";

    return 0;
// --snip--
}
Tip
We can create
stringsandstring_viewsfrom string literals using literal operators. Literal operators are suffixes you attach to a literals; like theusuffix to make an integer literalunsigned, that can be used to construct a custom type from the literals. In this case, we can make astringorstring_viewusing thesorsvliteral operators respectively. These are found in the namespacestd::literalswhich we expose globally in the line abovemain().
Spans
We can general this ntion of a view using the std::span type. Because spans are more
general than a string_view there are far fewer methods available however, they still
cover all you need when working with a generalised view (or span) of a contiguous
data structure.
spans are used for similar reasons to string_view, to easily accesses subslices of a
contiguous data structure (ie. a subarray) or to adapt C-arrays into a safer type.
#include <iostream>
#include <array>
#include <span>

auto main() -> int {
    // --snip--

    auto a1 = std::array{1, 2, 3, 4, 5};
    auto s1 = std::span(a1.data() + 1, 3);

    int a2[] = {1, 2, 3, 4, 5}; // C-array
    auto s2 = std::span{a2};

    return 0;
}
    // --snip--
Caution
You don’t need to worry about why C-arrays are unsafe for the purposes of this book. In a nutshell C-arrays (and string literals for that matter) are very primitive structures that do not provide any guards from misuse.
This has the benefit of allowing clever uses of the structures for the sake of performance and optimization which can be a good thing for system languages especially for the time period C came onto the scene however, when learning a system language guards help ensure correct practices are followed and engrained early in your journey so they do not become footguns in the future. This is why this book does not cover content from C as C++ has given many safer alternatives for decades.
Structures
A structure or struct is a way to aggregate or group related data together while giving each piece of data a distinct name, unlike tuples. We’ll explore; in this chapter, how to define and instantiate structs, access stored data via member variables and invoke member functions on instances of structs.
Creating Structures
To declare a struct we use the struct keyword followed by the name of the new type.
Members are defined inside curly braces using the same variable and function declaration
syntax we have seen previously; although variables do not need an initializer and thus
auto is less powerful in member variable declarations. The entire struct is capped by a
semicolon.
#include <string>

struct Person {
    bool alive;
    std::size_t age;
    std::string name;
    std::string email;
};

auto main() -> int {
    return 0;
}
We can then create an instance of the struct using an aggregate initializer. This is the process of giving concrete value to the member variables using a brace-initializer list. The order in which we initialize member variables is the same as the order member variables are declared in.
#include <string>

struct Person {
    bool alive;
    std::size_t age;
    std::string name;
    std::string email;
};

auto main() -> int {
    const auto p = Person{
        true,
        23,
        "John Doe",
        "johnd@example.com"
    };

    return 0;
}
To access member variables we use the member access operator (.). If your object is
not constant you can also assign new values to members through the dot operator.
#include <string>

struct Person {
    bool alive;
    std::size_t age;
    std::string name;
    std::string email;
};

auto main() -> int {
    auto p = Person {
        true,
        23,
        "John Doe",
        "johnd@example.com"
    };

    p.email = "jdoe@sample.com";

    return 0;
}
Tip
You can mark individual member variables as
constso only certain data can be modified.
Functions can return structs just like builtin types. Here we have a function that
creates a Person.
#include <string>
#include <string_view>

struct Person {
    bool alive;
    std::size_t age;
    std::string name;
    std::string email;
};

auto make_person(std::string_view const name, std::string_view const email) -> Person {
    return Person {
        true,
        0,
        std::string{name},
        std::string{email}
    };
}

auto main() -> int {
    const auto p = make_person("John Doe", "johnd@example.com");

    return 0;
}
For simple structs like this, the compiler will generate a few constructors for us such as a default constructor and a copy constructor. These allow these simple types to be copied or constructed in a default state without having to specify this process ourselves.
#include <string>
#include <string_view>

struct Person {
    bool alive;
    std::size_t age;
    std::string name;
    std::string email;
};

auto make_person(std::string_view const name, std::string_view const email) -> Person {
    return Person {
        true,
        0,
        std::string{name},
        std::string{email}
    };
}

auto main() -> int {
    const auto p1 = make_person("John Doe", "johnd@example.com");

    // Default construct
    auto p2 = Person{};

    // Copy
    auto p3 = p1;

    return 0;
}
Important
Constructors
We will explore constructors Chapter 8 - Custom Types and how we can use them to control the initialization of our own types. We will also explore how to disable certain constructors to disallow certain behaviours from our types.
Using Structures
Let us explore how structs can be used in everyday programs. We are going to create a simple program to calculate operations on a 3D vector type.
#include <cmath>
#include <iostream>

auto magnitude(const double x, const double y, const double z) -> double {
    return std::sqrt(x * x + y * y + z * z);
}

auto main() -> int {
    const auto x = 2.;
    const auto y = 3.;
    const auto z = 5.;

    std::cout << "The magnitude of the vector is "
              << magnitude(x, y, z)
              << "units.\n";

    return 0;
}
Refactoring with Tuples
We can make this code more concise by packing the data into a tuple. This allows the
type signature of magnitude() to be much simpler; taking a single parameter, and
ensures all our data is collected together. However, using a tuple leaves room for
ambiguity in which piece of data has which meaning as none of the elements have names.
#include <cmath>
#include <iostream>
#include <tuple>

using vec3 = std::tuple<double, double, double>;

auto magnitude(const vec3 vec) -> double {
    const auto& [x, y, z] = v;
    return std::sqrt(x * x + y * y + z * z);
}

auto main() -> int {
    const auto v = vec3{2., 3., 5.};

    std::cout << "The magnitude of the vector is "
              << magnitude(v)
              << "units.\n";

    return 0;
}
Tip
- The line starting with the
usingkeyword is used introduce a type alias. This allows us to define a shorter name for a type we are using frequently. This is particularly useful for tuples such that we can distinguish two tuples of the same underlying types but with different purposes. - We could also have used
std::make_tuple()to create our tuple object inmain()however, I used the brace-initialized from with the type alias to make it clearer what typevis supposed to be.
Refactoring with structs
We can add more meaning by create a vec3 struct with named x, y and z data members.
Now our magnitude() function is able to access the member variables by name.
#include <cmath>
#include <iostream>

struct vec3 {
    double x;
    double y;
    double z;
};

auto magnitude(const vec3 vec) -> double {
    return std::sqrt(vec.x * vec.x
                   + vec.y * vec.y
                   + vec.z * vec.z);
}

auto main() -> int {
    const auto v = vec3{2., 3., 5.};

    std::cout << "The magnitude of the vector is "
              << magnitude(v)
              << "units.\n";

    return 0;
}
Methods
As discussed before, methods are functions that are called on instances of a struct. This allows the method to access the member variables of the struct and just like regular functions we can pass parameters and return values from methods.
Defining Methods
Let’s change our example program from before to use methods instead of a free function. We define methods within the structs curly braces just like regular functions and call the function using the dot syntax on an instance of the struct.
#include <cmath>
#include <iostream>

struct vec3 {
    double x;
    double y;
    double z;

    auto magnitude() const -> double {
        return std::sqrt(x * x + y * y + z * z);
    }
};

auto main() -> int {
    const auto v = vec3{2., 3., 5.};

    std::cout << "The magnitude of the vector is "
              << v.magnitude()
              << "\n";

    return 0;
}
Note: The
constafter the parameter declaration and before the trailing return arrow does not mean the return type is constant, but rather indicates that this method does not modify the member variables of thisvec3instance and thus can be used on onconstinstances.
this keyword
Implicitly, all methods are passed an argument called this which is a pointer to the
instance of the struct the method was called on. this can be omitted in most cases
with variables automatically being looked up in the struct instance however, if the name
lookup is ambiguous ie. there is a parameter of the same name, then you will need to
access the member variable through this. Because this is a pointer you cannot use the
dot operator but must use the -> operator to deference the pointer.
#include <cmath>
#include <iostream>
#include <string>

struct vec3 {
    double x;
    double y;
    double z;

    auto magnitude() const -> double {
        return std::sqrt(x * x + y * y + z * z);
    }

    auto normalized() const -> vec3 {
        const auto sz = this->magnitude();
        return vec3{x / sz, y / sz, z / sz};
    }

    // Helper method for stringifying vec3
    auto to_string() const -> std::string {
        auto ss = std::stringstream{};
        ss << "{ "
           << x
           << ", "
           << y
           << ", "
           << z
           << " }";

        return ss.str();
};

auto main() -> int {
    const auto v = vec3{2., 3., 5.};

    std::cout << "The magnitude of the vector is "
              << v.magnitude()
              << "\n";

    const auto n = v.normalized();

    std::cout << "Vector v: "
              << v.to_string()
              << " is: "
              << n.to_string()
              << "\n";

    return 0;
}
Warning
We will discuss pointers properly and in detail in Chapter 13 - Memory but for now, think of pointers as like references but closer to a hardware concept.
Taking Parameters
As stated before, we can declare parameters for methods such that they can take arguments with parameters a declared the same as with free functions.
#include <cmath>
#include <iostream>
#include <sstream>
#include <string>

struct vec3 {
    double x;
    double y;
    double z;

    auto magnitude() const -> double {
        return std::sqrt(x * x + y * y + z * z);
    }

    auto normalized() const -> vec3 {
        const auto sz = this->magnitude();
        return vec3{x / sz, y / sz, z / sz};
    }

    auto dot(const vec3& u) const -> double {
        return x * u.x + y * u.y + z * u.z;
    }

    // Helper method for stringifying vec3
    auto to_string() const -> std::string {
        auto ss = std::stringstream{};
        ss << "{ "
           << x
           << ", "
           << y
           << ", "
           << z
           << " }";

        return ss.str();
    }
};

auto main() -> int {
    const auto v = vec3{2., 3., 5.};

    std::cout << "The magnitude of the vector is "
              << v.magnitude()
              << "\n";

    const auto n = v.normalized();

    std::cout << "Vector v: "
              << v.to_string()
              << " is: "
              << n.to_string()
              << "\n";

    const auto u = vec3{2., -3., 5.};

    std::cout << "Dot product of v: "
              << v.to_string()
              << " and u: "
              << u.to_string()
              << " is: "
              << v.dot(u)
              << " units \n";

    return 0;
}
Operator Overloading
Just like we can define overloaded operators as free functions we can define overloaded operators within a struct however, the left hand argument is always the the struct instance the operator is defined on.
#include <cmath>
#include <iostream>
#include <sstream>
#include <string>

struct vec3 {
    double x;
    double y;
    double z;

    auto magnitude() const -> double {
        return std::sqrt(x * x + y * y + z * z);
    }

    auto normalized() const -> vec3 {
        const auto sz = this->magnitude();
        return vec3{x / sz, y / sz, z / sz};
    }

    auto dot(const vec3& u) const -> double {
        return x * u.x + y * u.y + z * u.z;
    }

    auto operator*(const vec3& u) const -> double {
        return this->dot(u);
    }

    // Helper method for stringifying vec3
    auto to_string() const -> std::string {
        auto ss = std::stringstream{};
        ss << "{ "
           << x
           << ", "
           << y
           << ", "
           << z
           << " }";

        return ss.str();
    }
};

auto main() -> int {
    const auto v = vec3{2., 3., 5.};

    std::cout << "The magnitude of the vector is "
              << v.magnitude()
              << "\n";

    const auto n = v.normalized();

    std::cout << "Vector v: "
              << v.to_string()
              << " is: "
              << n.to_string()
              << "\n";

    const auto u = vec3{2., -3., 5.};

    std::cout << "Dot product of v: "
              << v.to_string()
              << " and u: "
              << u.to_string()
              << " is: "
              << v * u
              << " units \n";

    return 0;
}
If we want to reorder the parameters of an operator on our struct but keep the definition
all together we can use the friend keyword to create a free function in a structs
definition. This also allows the friend function to access the members of the struct
instance. The friend keyword becomes more relevant when discussing
Access Modifiers in Chapter 8.
#include <cmath>
#include <iostream>
#include <ostream>

struct vec3 {
    double x;
    double y;
    double z;

    auto magnitude() const -> double {
        return std::sqrt(x * x + y * y + z * z);
    }

    auto normalized() const -> vec3 {
        const auto sz = this->magnitude();
        return vec3{x / sz, y / sz, z / sz};
    }

    auto dot(const vec3& u) const -> double {
        return x * u.x + y * u.y + z * u.z;
    }

    auto operator*(const vec3& u) const -> double {
        return this->dot(u);
    }

    friend auto operator<<(std::ostream& os, const vec3& v) -> std::ostream& {
        os << "{ "
           << x
           << ", "
           << y
           << ", "
           << z
           << " }";

        return os;
    }
};

auto main() -> int {
    const auto v = vec3{2., 3., 5.};

    std::cout << "The magnitude of the vector is "
              << v.magnitude()
              << "\n";

    const auto n = v.normalized();

    std::cout << "Vector v: "
              << v
              << " is: "
              << n
              << "\n";

    const auto u = vec3{2., -3., 5.};

    std::cout << "Dot product of v: "
              << v
              << " and u: "
              << u
              << " is: "
              << v * u
              << " units \n";

    return 0;
}
Static Functions
We can also declare static methods on a struct which do not operate on an instance but
are simply bound to the struct itself. We declare static methods with the static
keyword
#include <cmath>
#include <iostream>
#include <ostream>

struct vec3 {
    double x;
    double y;
    double z;

    static auto unit_x() -> vec3 {
        return vec3{1., 0., 0.};
    }

    auto magnitude() const -> double {
        return std::sqrt(x * x + y * y + z * z);
    }

    auto normalized() const -> vec3 {
        const auto sz = this->magnitude();
        return vec3{x / sz, y / sz, z / sz};
    }

    auto dot(const vec3& u) const -> double {
        return x * u.x + y * u.y + z * u.z;
    }

    auto operator*(const vec3& u) const -> double {
        return this->dot(u);
    }

    // Helper method for stringifying vec3
    friend auto operator<<(std::ostream& os, const vec3& v) -> std::ostream& {
        os << "{ "
           << x
           << ", "
           << y
           << ", "
           << z
           << " }";

        return os;
    }
};

auto main() -> int {
    const auto v = vec3{2., 3., 5.};

    std::cout << "The magnitude of the vector is "
              << v.magnitude()
              << "\n";

    const auto n = v.normalized();

    std::cout << "Vector v: "
              << v
              << " is: "
              << n
              << "\n";

    const auto u = vec3{2., -3., 5.};

    std::cout << "Dot product of v: "
              << v
              << " and u: "
              << u
              << " is: "
              << v * u
              << " units \n";

    return 0;
}
Summary
While this chapter has only a handful of pages we covered a lot of new features and syntax. From defining and creating structs, attaching methods to structures and even static methods!
Appendix
Warning
🚧 Page Under Construction! 🏗️
Useful info about C++ that doesn’t fit into the model of the book.
A - Keywords
Warning
🚧 Page Under Construction! 🏗️
This is the list of keywords reserved by C++. This means these words cannot be used as an identifier for variables, functions, class/struct member names etc.. Some are reserved with no current or deprecated usecase.
Currently in Use
| Keyword | Description |
|---|---|
alignas (C++11) | |
and | |
and_eq | |
asm | |
auto | |
bitand | |
bitor | |
break | |
case | |
catch | |
class | |
compl | |
concept (C++20) | |
const | |
consteval (C++20) | |
constexpr (C++11) | |
constinit (C++20) | |
continue | |
co_await (C++20) | |
co_return (C++20) | |
co_yield (C++20) | |
decltype (C++11) | |
default | |
do | |
double | |
else | |
enum | |
explicit | |
export | |
extern | |
false | |
float | |
for | |
friend | |
goto | |
if | |
inline | |
mutable | |
namespace | |
noexcept (C++11) | |
not | |
not_eq | |
nullptr (C++11) | |
operator | |
or | |
or_eq | |
private | |
protected | |
public | |
register | |
requires (C++20) | |
return | |
signed | |
sizeof | |
static | |
static_assert (C++11) | |
struct | |
switch | |
template | |
this | |
thread_local (C++11) | |
throw | |
true | |
try | |
typedef | |
typename | |
union | |
unsigned | |
using | |
virtual | |
void | |
volatile | |
while | |
xor | |
xor_eq |
Reserved In Specific Contexts
These keywords are reserved in specific circumstances like in a class declaration etc..
| Keyword | Description |
|---|---|
final (C++11) | Specifies virtual member function cannot be overridden in child class. |
override (C++11) | Specifies virtual member function definition overrides parent definition. |
import (C++20) | Module import declaration. |
module (C++20) | Module and module fragment declaration. |
Reserved for Future Use
These keywords are reserved for experimental features being tested in a Technical Specification.
| Keyword | Technical Specification | Description |
|---|---|---|
atomic_cancel | Transactional Memory (TM) TS | Starts atomic block that will restore data modified during atomic block for some exception types, otherwise it will call std::abort. |
atomic_commit | Transactional Memory (TM) TS | Starts atomic block that commits data changes regardless of exceptions being thrown. |
atomic_noexcept | Transactional Memory (TM) TS | Starts atomic block that will call std::abort if exception is thrown within the block. |
reflexpr | Reflection TS | Provides meta info about an object by returning a meta-object. |
synchronized | Transactional Memory (TM) TS | Starts a synchronized block |
transaction_safe | Transactional Memory (TM) TS | Indicates that a function is transaction-safe. |
transaction_safe_dynamic | Transactional Memory (TM) TS | Indicates that a virtual function is transaction-safe. |
B - Operators
Warning
🚧 Page Under Construction! 🏗️
This page is a high level overview of C++ operators and other symbols and what they do.
- ✅ - Fully overloadable
- ☑️ - Overloadable with constraints
- ⚠️ - Overloadable but not recommended
- ❌ - Not overloadable
Basic Operators
| Operator | Example | Description | Overloadable |
|---|---|---|---|
+ | +expr | Arithmetic posigation | ✅ |
+ | expr + expr | Arithmetic addition | ✅ |
++ | ++expr | Prefix increment | ✅ |
++ | expr++ | Postfix increment | ✅ |
+= | var += expr | Arithmetic addition and assignment | ✅ |
- | -expr | Arithmetic negation | ✅ |
- | expr - expr | Arithmetic subtraction | ✅ |
-- | --expr | Prefix decrement | ✅ |
-- | expr-- | Postfix decrement | ✅ |
-= | var -= expr | Arithmetic subtraction and assignment | ✅ |
* | *expr | Pointer dereference | ☑️ |
* | expr * expr | Arithmetic multiplication | ✅ |
*= | var *= expr | Arithmetic multiplication and assignment | ✅ |
/ | expr / expr | Arithmetic division | ✅ |
/= | var /= expr | Arithmetic division and assignment | ✅ |
% | expr % expr | Arithmetic remainder | ✅ |
%= | var %= expr | Arithmetic remainder and assignment | ✅ |
~ | ~expr | Bitwise Complement | ✅ |
& | &expr | Address of | ✅ |
& | type ident&, const type ident& | Reference type | ❌ |
& | expr & expr | Bitwise AND | ✅ |
&= | var &= expr | Bitwise AND and assignment | ✅ |
&& | expr && expr | Logical AND | ☑️ |
| | expr | expr | Bitwise OR | ✅ |
|= | var |= expr | Bitwise OR and assignment | ✅ |
|| | expr || expr | Logical OR | ☑️ |
^ | expr ^ expr | Bitwise XOR | ✅ |
^= | var ^= expr | Bitwise XOR and assignment | ✅ |
<< | expr << expr | Bitwise left shift | ✅ |
<<= | var <<= expr | Bitwise left shift and assignment | ✅ |
>> | expr >> expr | Bitwise right shift | ✅ |
>>= | var >>= expr | Bitwise right shift and assignment | ✅ |
! | !expr | Logical NOT | ✅ |
== | expr == expr | Equality comparison | ✅ |
!= | expr != expr | Inequality comparison | ✅ |
< | expr < expr | Less than | ✅ |
<= | expr <= expr | Less than or equal | ✅ |
> | expr > expr | Greater than | ✅ |
>= | expr >= expr | Greater than or equal | ✅ |
<=> | expr <=> expr | Three way comparison | ✅ |
[] | expr[expr, expr, ..] | Subscript / array indexing (multi-argument since C++23) | ✅ |
() | expr(expr, expr, ..) | Function object invocation | ✅ |
, | expr, expr | Comma sequencing | ⚠️ |
= | var = expr, ident = expr | Assignment / Binding | ☑️ |
?: | expr ? expr : expr | Ternary expression | ❌ |
:: | ident::ident, ident::var | Namespace lookup | ❌ |
... | typename types..., type T..., T... args | Parameter type and value packs | ❌ |
. | expr.ident | Member access | ❌ |
.* | expr.*ident | Member access to pointer members | ❌ |
-> | expr->ident | Member access through a pointer | ☑️ |
->* | expr->*ident | Member access through a pointer to pointer members | ☑️ |
"" | literal_suffix-ident | User defined literal | ☑️ |
Memory Operators
| Operator | Example | Description |
|---|---|---|
new | new type (init-list) | Allocate a heap memory object constructed with parameters in init-list |
new [] | new type[size]{init-list} | Allocate a heap memory block initialized with elements in init-list |
delete | delete expr | Delete heap memory object |
delete [] | delete [] expr | Deletes heap memory block |
Type Casting Operators
| Operator | Example | Description |
|---|---|---|
static_cast | static_cast<T>(expr) | Casts expr to type T |
dynamic_cast | dynamic_cast<T>(expr) | Casts pointers and references to classes up, down and sideways through inheritance hierarchy |
reinterpret_cast | reinterpret_cast<T>(expr) | Casts expr to type T by reinterpreting underlying bits of expr |
const_cast | const_cast<T>(expr) | Can cast to or away const when type of expr and T are similar types |
| C-cast | (type)expr | Legacy type cast from C, uses a combination of above casts |
Other Operators
| Operator | Example | Description |
|---|---|---|
sizeof | sizeof(expr), sizeof(type) | Obtains the size in bytes of a type or expression |
sizeof... | sizeof...(pack-expr), sizeof(pack-type) | Obtains the number of elements of a parameter pack |
typeid | typeid(expr), typeid(type) | Obtains compiler representation of a type |
noexcept | noexcept(expr) | Checks if an expression will throw an exception |
alignof | alignof(typeid) | Obtains the alignment required by a type |
C - Standard Versions
Warning
🚧 Page Under Construction! 🏗️
D - Recommended Compiler Flags
Warning
🚧 Page Under Construction! 🏗️